Create a Trip
Use this guide to submit a travel request in the Trips module. By the end, your trip has the traveler, project links, trip details, estimated costs, and any required budget information.
- You need access to the Trips module.
- You need permission to create trips.
- You need Allowed to Add Trips on Behalf of Others if you submit a trip for another traveler.
- Trips Settings decide whether purpose, estimated costs, actual costs, and approvals are required.
Step 1: Click Create New Trip
Open Trips -> Dashboard, then click Create new trip in the top right of the Trips page. Compass opens the Create New Trip form.
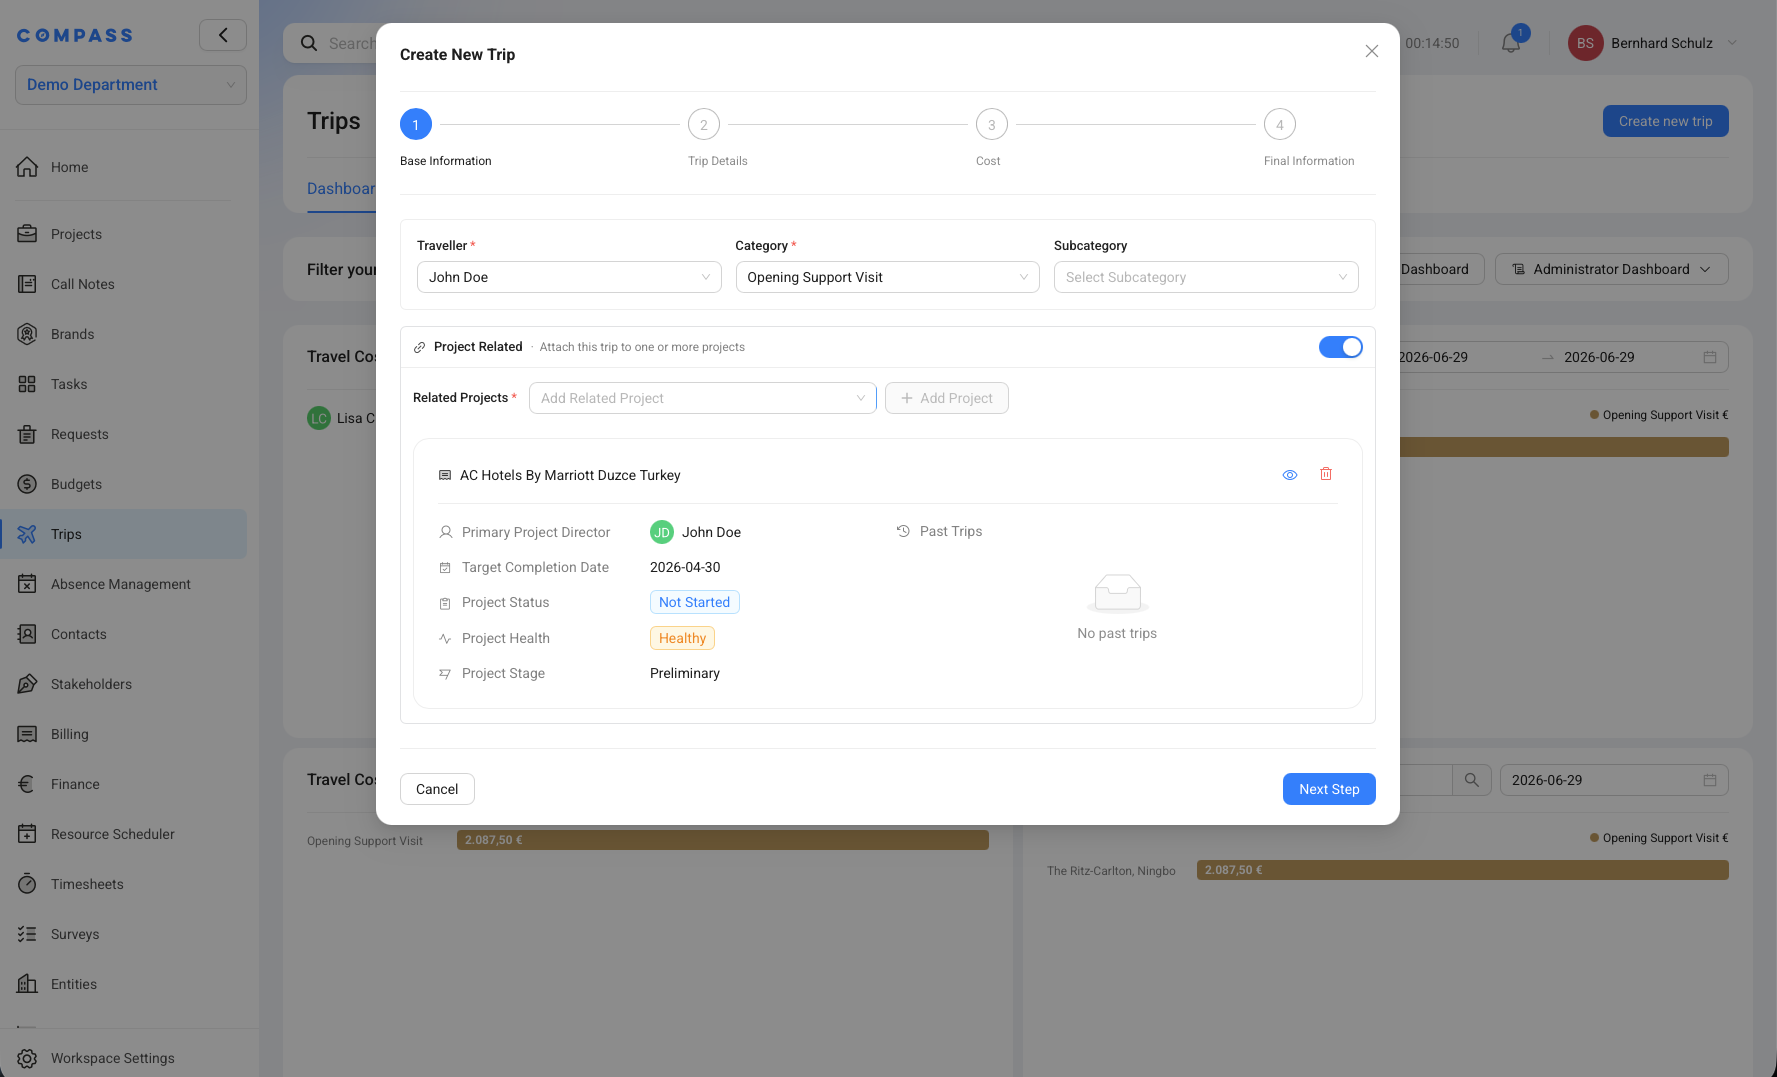
The form is split into steps. The first step is Base Information, where you choose who is traveling and which project or projects the trip belongs to.
Step 2: Select The Traveler
Select the Traveller for the trip. If you are creating a trip for yourself, your own name may already be selected.
If your role can submit trips for other users, choose the correct traveler from the dropdown. If you do not have that permission, you can only create trips for yourself.
Step 3: Choose The Trip Category
Choose a Category and, if needed, a Subcategory. These values help your team group trips for approval, dashboards, and reporting.
Example: Choose
Opening Support Visitwhen the trip is for on-site opening support.
Your role may only let you choose from the list. Administrators can manage the category and subcategory options from the dropdown if their field permissions allow it.
Step 4: Add Related Projects
Turn on Project Related when the trip belongs to one or more projects. Then select the project and click Add Project.
A trip can be connected to multiple projects. This is useful when one visit supports several properties or several project workstreams.
Example: A traveler visits
AC Hotels By Marriott Duzce Turkeyand another nearby property during the same trip. Add both projects so costs can be split later.
Step 5: Enter Where And How You Travel
Click Next Step to open Trip Details. Enter the From location, Destination, and Travel Method.
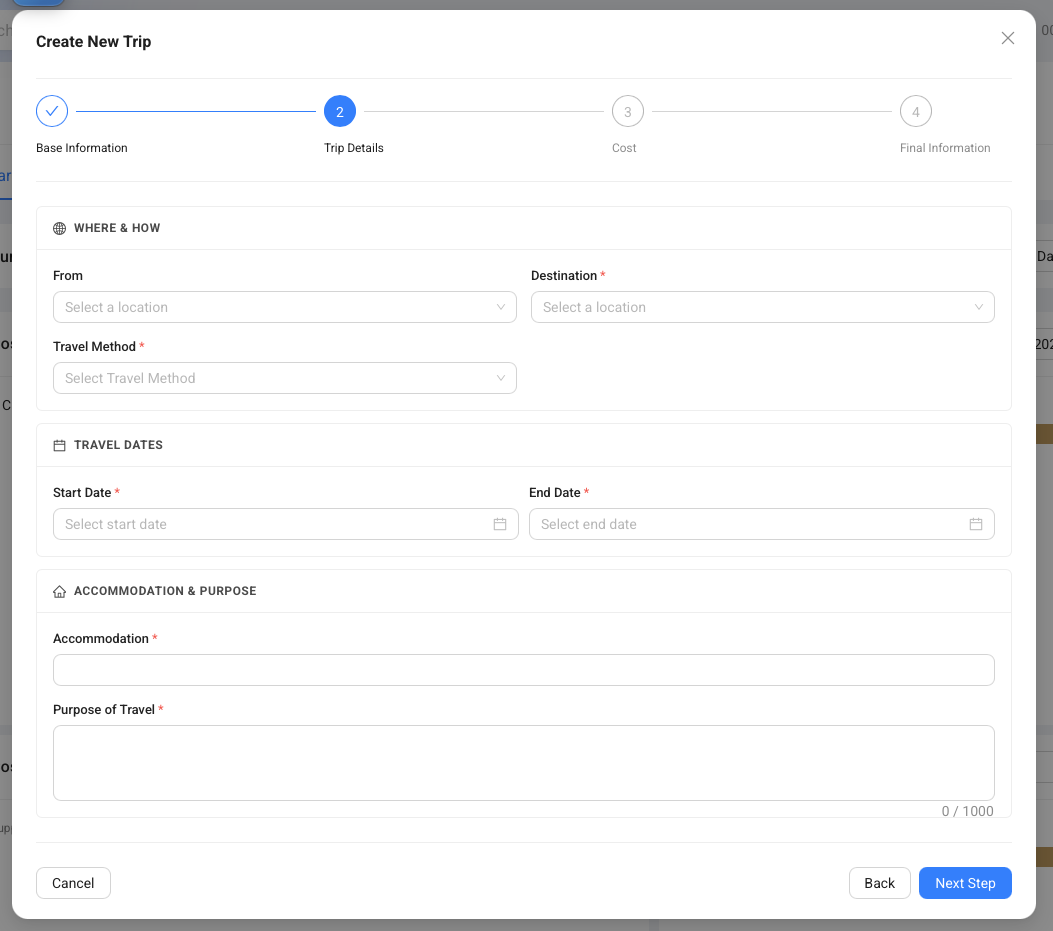
Choose the travel method that best describes the main journey, such as Flight Economy. The travel method list can be managed by allowed roles.
Step 6: Enter Travel Dates
Enter the Start Date and End Date for the trip. These dates help Compass show upcoming trips, calendar activity, travel days, and reporting periods.
Choose dates carefully, because they also affect when a trip moves through its status flow after the trip is complete.
Step 7: Enter Accommodation And Purpose
Enter the Accommodation for the trip. If Purpose of Travel Required is turned on in Trips Settings, also enter the Purpose of Travel.
Example:
China demo opening support visit - The Ritz-Carlton, Ningbo
If administrators added instructions for the purpose field, read them before you submit. They explain what information your team expects.
Step 8: Enter Estimated Costs
If cost estimation is required, click Next Step and enter the Estimate Cost of Transportation and Estimate Cost of Stay.
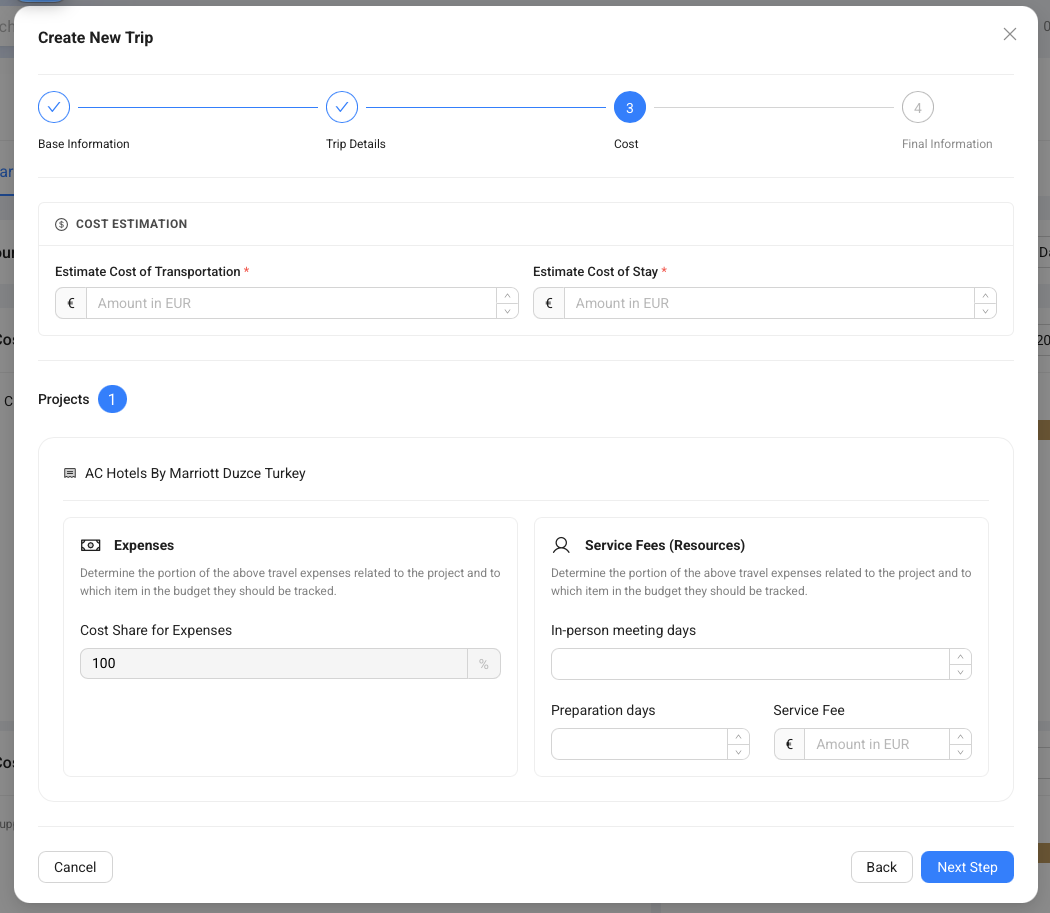
These are planning numbers. They help approvers and finance teams understand the expected cost before the trip happens.
Step 9: Split Expenses By Project
In the Projects section of the cost step, enter the Cost Share for Expenses for each related project.
If the trip has one project, use 100%. If the trip has several projects, split the percentage between them. The total should represent the full trip expense.
Example: Use
60%for one project and40%for another when the same trip supports both.
Step 10: Enter Service Fee Details
Use Service Fees (Resources) when the trip should record travel time or support time for a project. Enter In-person meeting days, Preparation days, and the Service Fee amount when required.
These fields help calculate chargeable service fees. They are separate from travel expenses like transportation and stay.
If the project blueprint requires travel time to be tied to a budget, Compass asks you to choose the budget here.
Step 11: Assign Budgets If Required
Choose the Budget and Budget Item for travel expenses or travel time when Compass asks for them. This happens when the related Project Blueprint allows or requires those costs to be allocated.
Think of budget assignment as putting the travel cost into the right envelope. Later, the project team can compare the budgeted amount with the actual travel spend.
If no Budget field appears, the Project Blueprint uses No cost allocation for that travel cost type. If the field appears but is optional, select a Budget Item only when the cost should be recorded against that budget line.
Budget allocation writes the final cost to the Budget Item's Actual Cost Ledger. It does not automatically make the trip customer-billable. External invoicing requires a Service Revenue Budget with matching settlement settings.
Step 12: Review And Submit The Trip
Continue to the final step, review the trip information, and submit the trip request. Compass then applies the approval settings for that traveler and trip.
If approval is required, the trip moves into an approval status. If approval is not required, it can move directly toward Ready For Trip.
Result
After you submit the trip, Compass saves the request and shows it in the Trips module. The trip also appears on the Travel tab of each related project.
Approvers can review the request if approval is required. If actual cost tracking is required, Compass asks for the final costs after the trip is complete.
Common Mistakes
Problem: You cannot choose another traveler.
Fix: Ask your administrator to check Users & Roles -> Roles -> Module Permissions -> Trips -> Allowed to Add Trips on Behalf of Others.
Problem: You cannot add a new category or travel method.
Fix: Ask your administrator to check your Trips field permissions. Many users can choose options but cannot manage the option lists.
Problem: The cost step asks for a budget, but you do not know which one to choose.
Fix: Check the related project budget or ask the project manager. The project blueprint requires travel costs to be assigned to a budget.
Problem: The purpose of travel field is required.
Fix: Enter a clear business reason for the trip. If a minimum character count is shown, add enough detail to meet it.