Task Validation Playbook
You have set up a Task Catalog, imported your catalog items, configured rules — and you have generated a task list for a project. Now you need to verify that everything came out right before you use it on a live project.
You can ask the Compass AI assistant any question about Compass — how features work, what settings to use, or how to troubleshoot a problem. Click the chat icon in the bottom right corner of this page, or press ⌘K (Mac) / Ctrl+K (Windows) and select Ask AI. The assistant has access to all Compass documentation and can guide you step by step.
This playbook walks you through a systematic check in four steps:
Prepare your dashboard
Set filters, columns, and grouping so you only see the tasks you need to validate.Check for missing tasks
Verify that every task you expect is actually there.Check for unexpected tasks
Verify that no tasks appear that should not be on this project.Verify task content
Confirm that titles, descriptions, dates, assignments, and other details are correct.By the end, you will know whether your catalog is ready or what needs fixing.
If you are not familiar with Task Catalogs and how task generation works, read these articles first:
- Task Catalogs — what a catalog is and how it is structured
- Task Catalog Items — what you can configure on each task template
- Applicability & Creation Rules — how rules control which tasks are created
- Creating Tasks for a Project — the full generation workflow
Prepare your Task Dashboard
Before you start checking tasks, set up the Task Dashboard so you can see exactly what you need — without distractions.
Filter to the right scope
Open the Task module from the sidebar. At the top, you will see quick filters and a Filter by Projects button. Start by selecting the project whose generated tasks you want to validate.
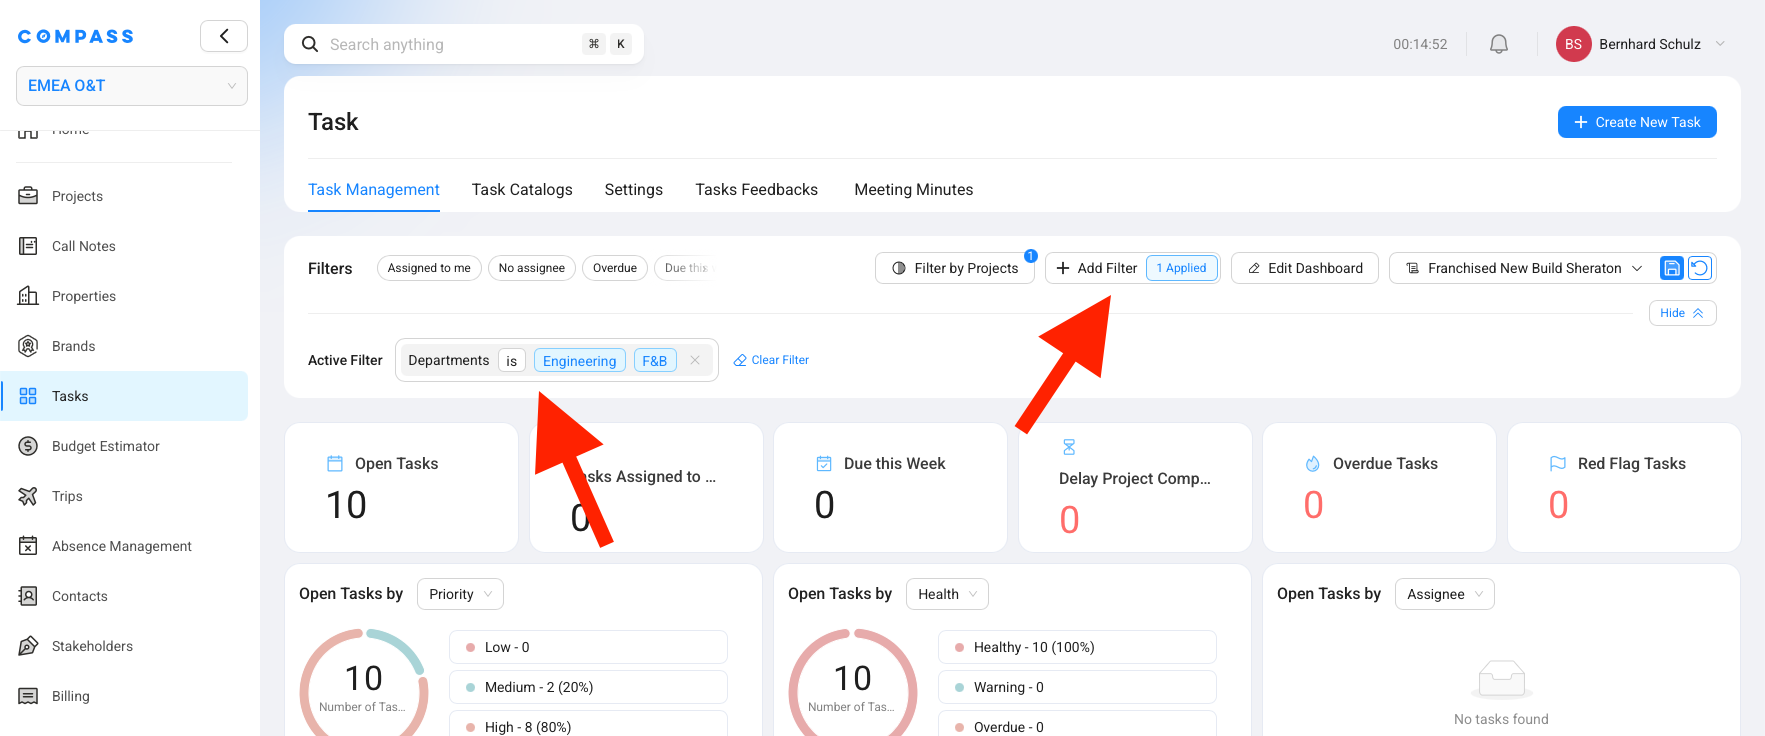
If you are only validating tasks for a specific department, category, or team, click + Add Filter to narrow things down further. In the Configure Filters dialog:
Select the field
Choose what you want to filter by — for example, Department.Choose the operator
Pick how the filter should match — for example, is.Pick the value
Enter or select the value — for example,Commercial.You can add multiple filter criteria. For example, filter by Department = Commercial and Category = Brand Health to see only the tasks that match both conditions.
Click Apply Filters to update the dashboard.
Optional: Customize your dashboard
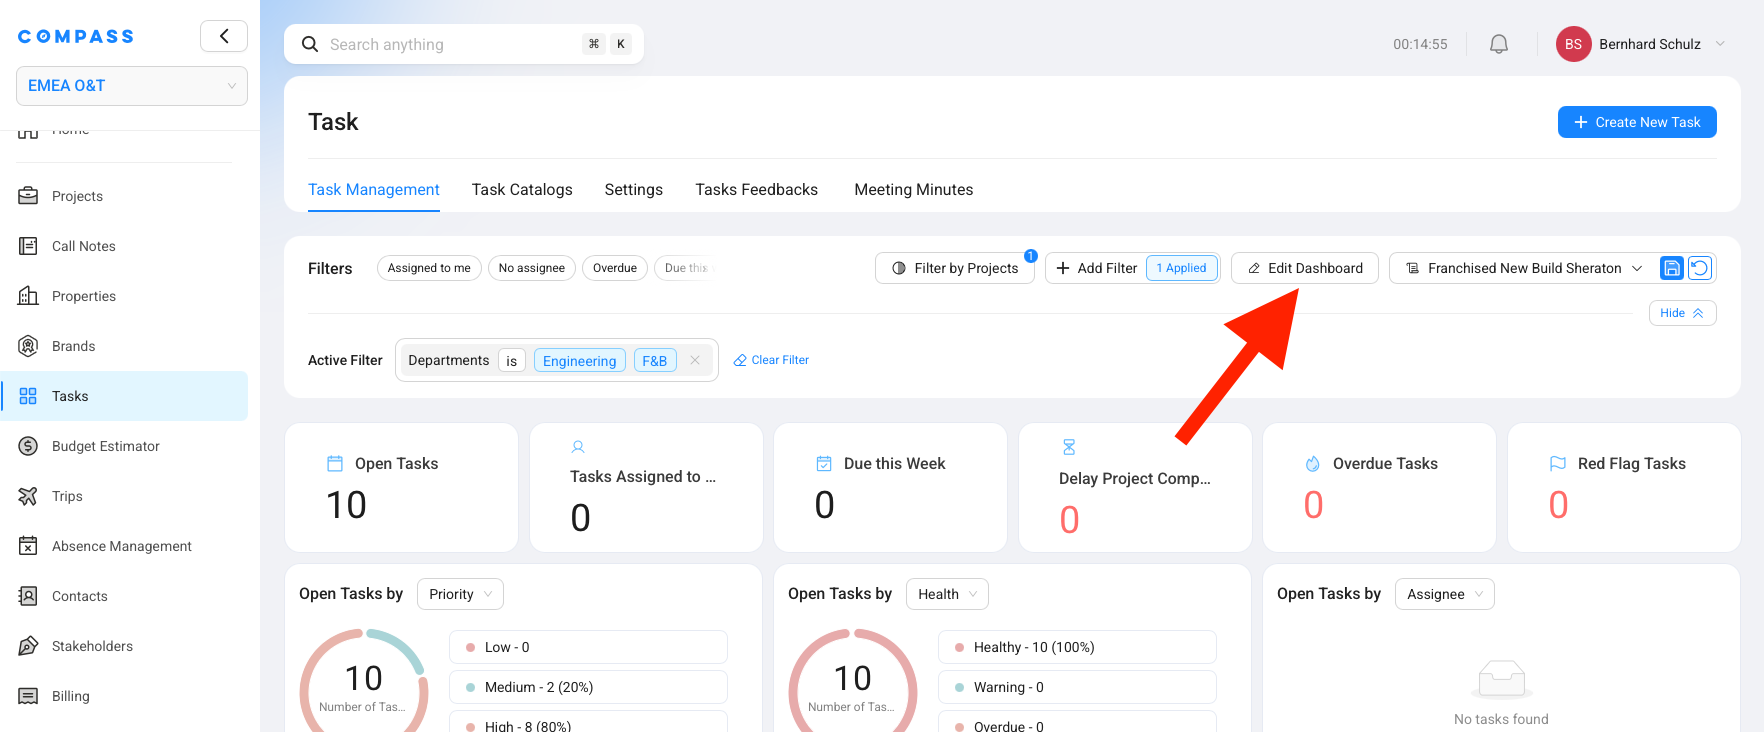
Remove dashboard widgets you don't need. If the summary cards (Open Tasks, Due This Week, Overdue Tasks, etc.) are getting in the way during validation, click Edit Dashboard to remove or rearrange them. You can also resize the task list to take up more screen space by dragging its edge.
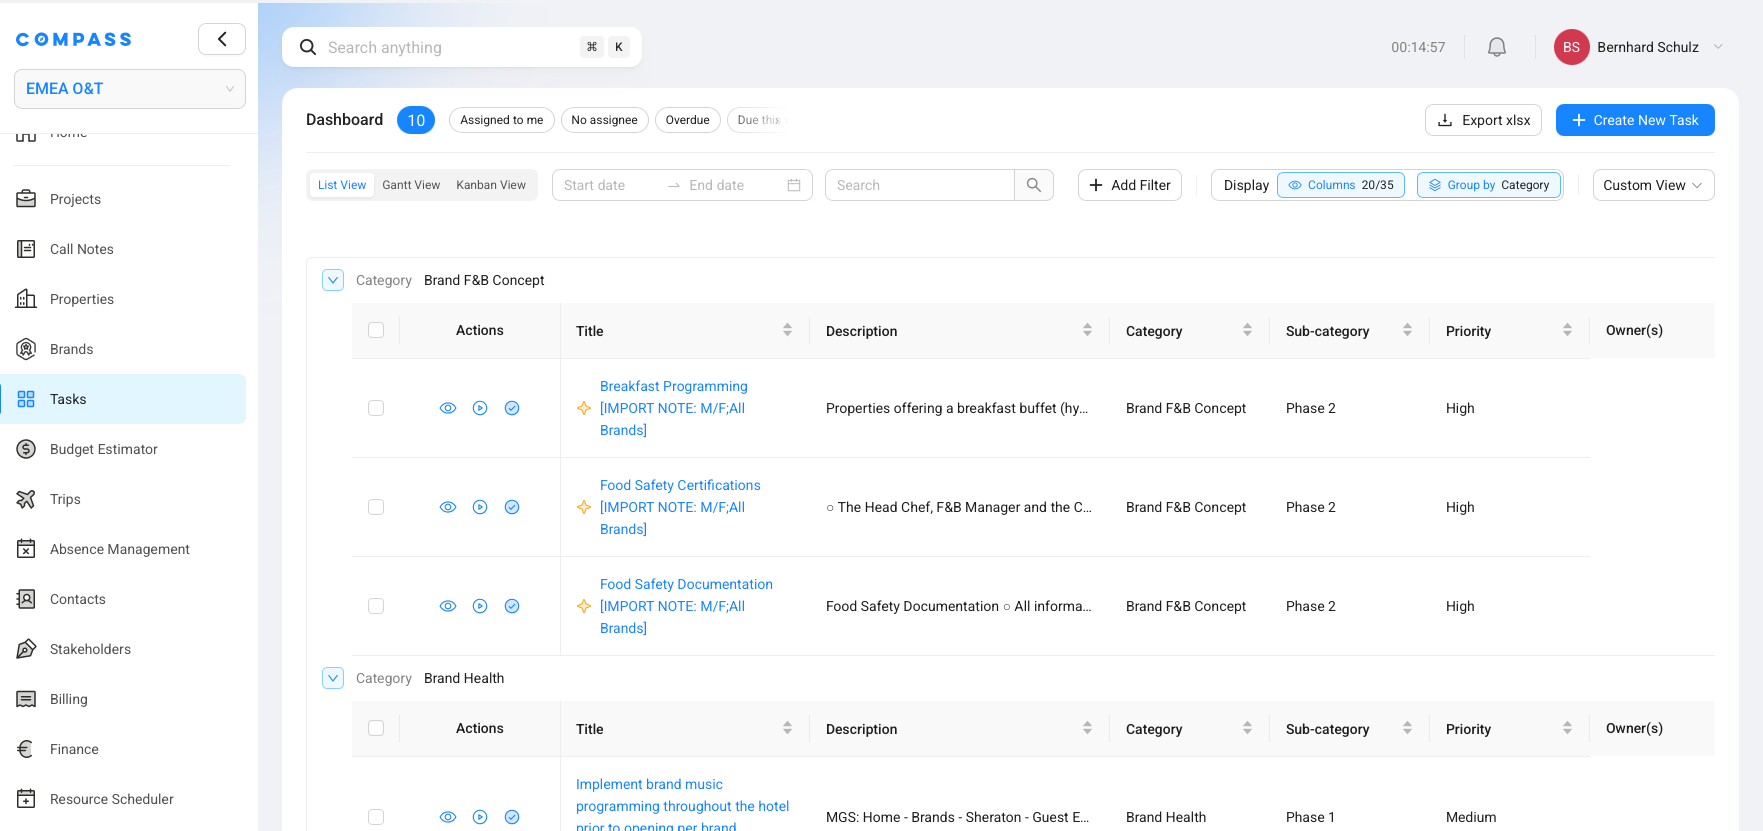
Change the columns in the task list. Click the Display button above the task list. In the dialog, check or uncheck columns to show the information you want to verify — for example, add Description, Sub-category, Discipline, or Task Due Date Relative To if they are not already visible. In the task table, you can re-order columns by dragging and dropping the column headers until the order matches how you want to scan the list.
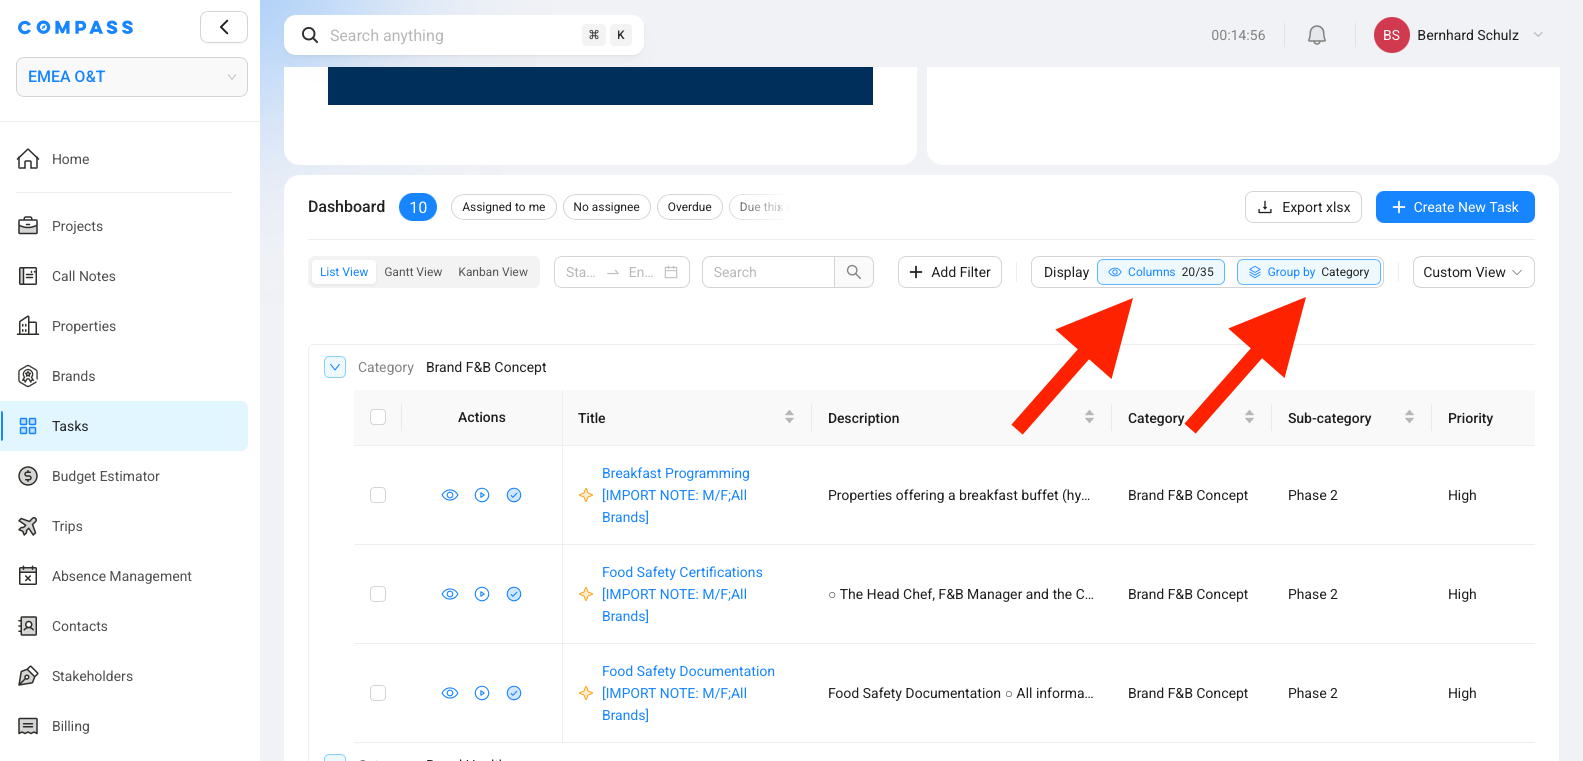
Group tasks for easier scanning. Click the Group by button to group tasks by Category, Department, or another field. This makes it much easier to spot patterns — like all the HR tasks sitting together, or all the Finance tasks in one group.
Step 1: Check that all expected tasks are present
Go through the task list and verify that every task you expect to see is actually there. Compare against your catalog or against a reference checklist your team uses.
If a task is missing, there are two possible reasons:
Missing Tasks? Reason A: The Task Catalog Item does not exist
The task was never added to the catalog in the first place. To check:
Open the catalog
Open the Tasks module from the sidebar. Under the page title, you will see a row of tabs: Task Management, Task Catalogs, Settings, Tasks Feedbacks, Meeting Minutes, and others. Your catalogs are under Task Catalogs, not under Task Management. Click Task Catalogs, then open the catalog you generated tasks from.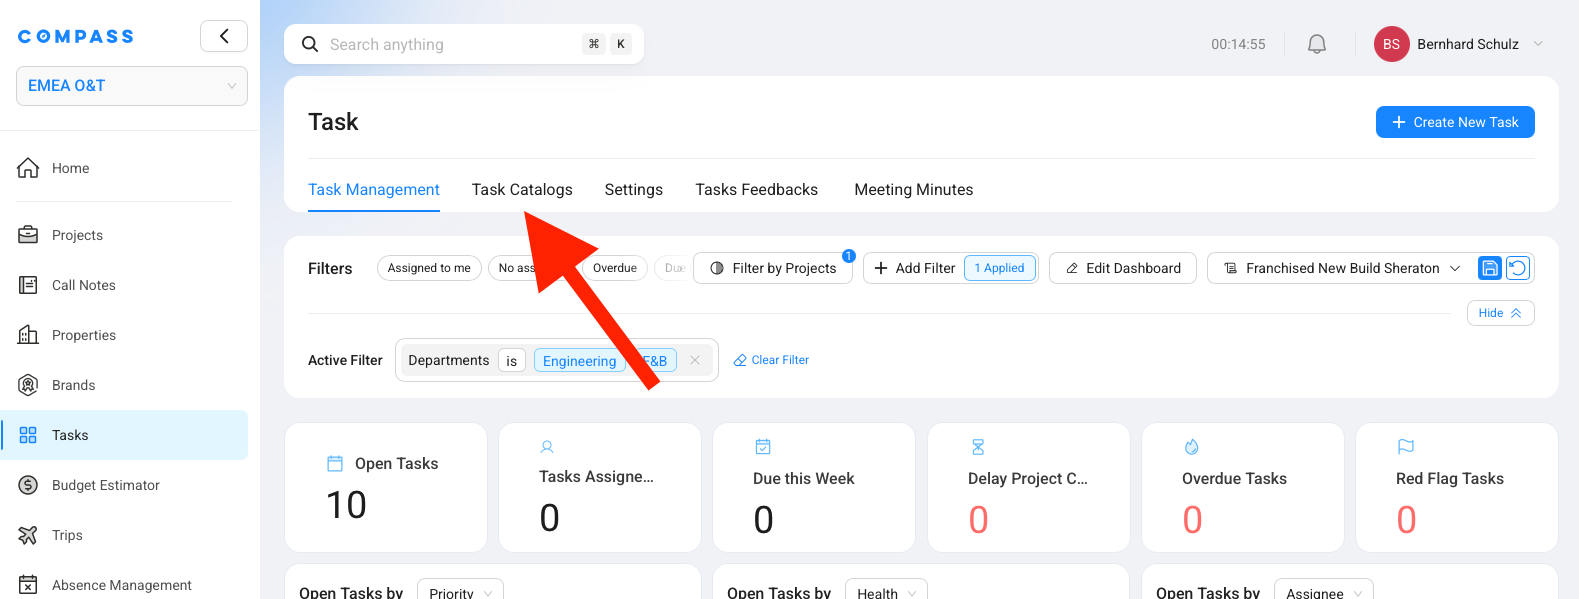
Search for the item
Search for the task by name in the catalog's Overview tab.Confirm whether it exists
If you cannot find it, the item does not exist yet.How to fix it:
Create a new catalog item
Click + Create New Catalog Item in the top right of the catalog.Fill in the details
Enter the task details — title, description, category, priority, timing, assignment, and any rules it needs. Save the item as Active so it can be used for task generation (Draft items are skipped).Generate the task on your project
Open the new catalog item and click Generate Task for Project in the top right corner. Select your project. The task is created immediately — you do not need to regenerate the entire catalog.
Missing Tasks? Reason B: The Task Catalog Item exists but no task was created
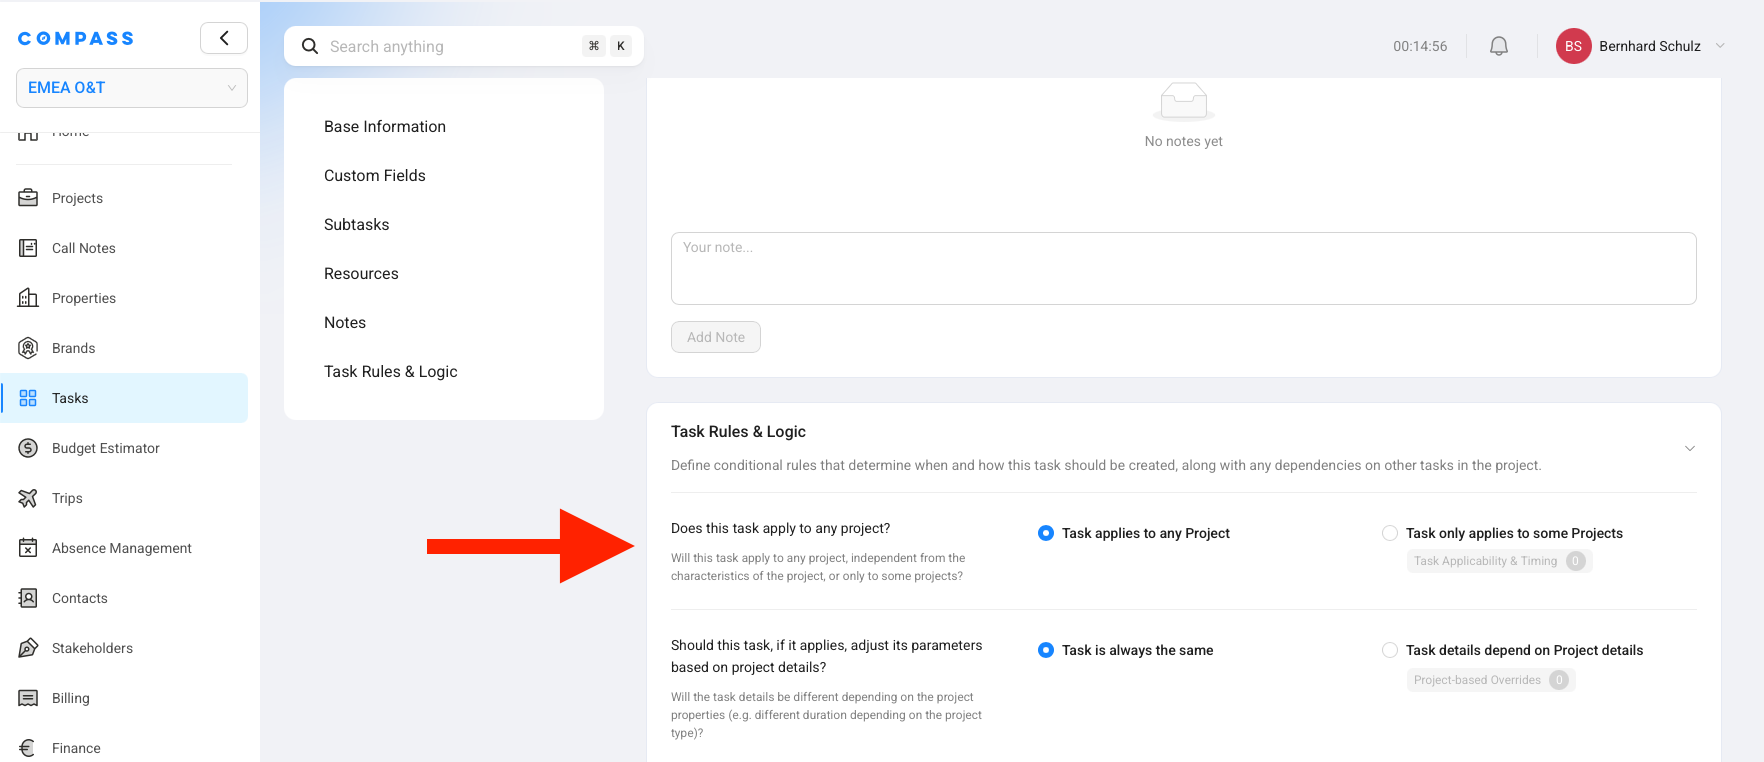
The item is in the catalog, but the task did not appear on your project. This almost always comes down to the rule settings. Open the Task Catalog Item and scroll to the Task Rules & Logic section.
Check the setting "Does this task apply to any project?" in Task Rules & Logic:
-
If it says "Task applies to any project" — the task should have been created regardless of project type. Check that the item's status is Active (not Draft or Rejected). If it is Active and still missing, this may be a technical issue (see Reporting issues below).
-
If it says "Task only applies to some projects" — the task is only created when an Applicability Rule matches. If no rule has been assigned to this item, or if the assigned rule's conditions do not match your project, the task will not be created.
How to fix it:
Open Task Applicability & Timing
Go to the Task Applicability & Timing tab on the catalog item.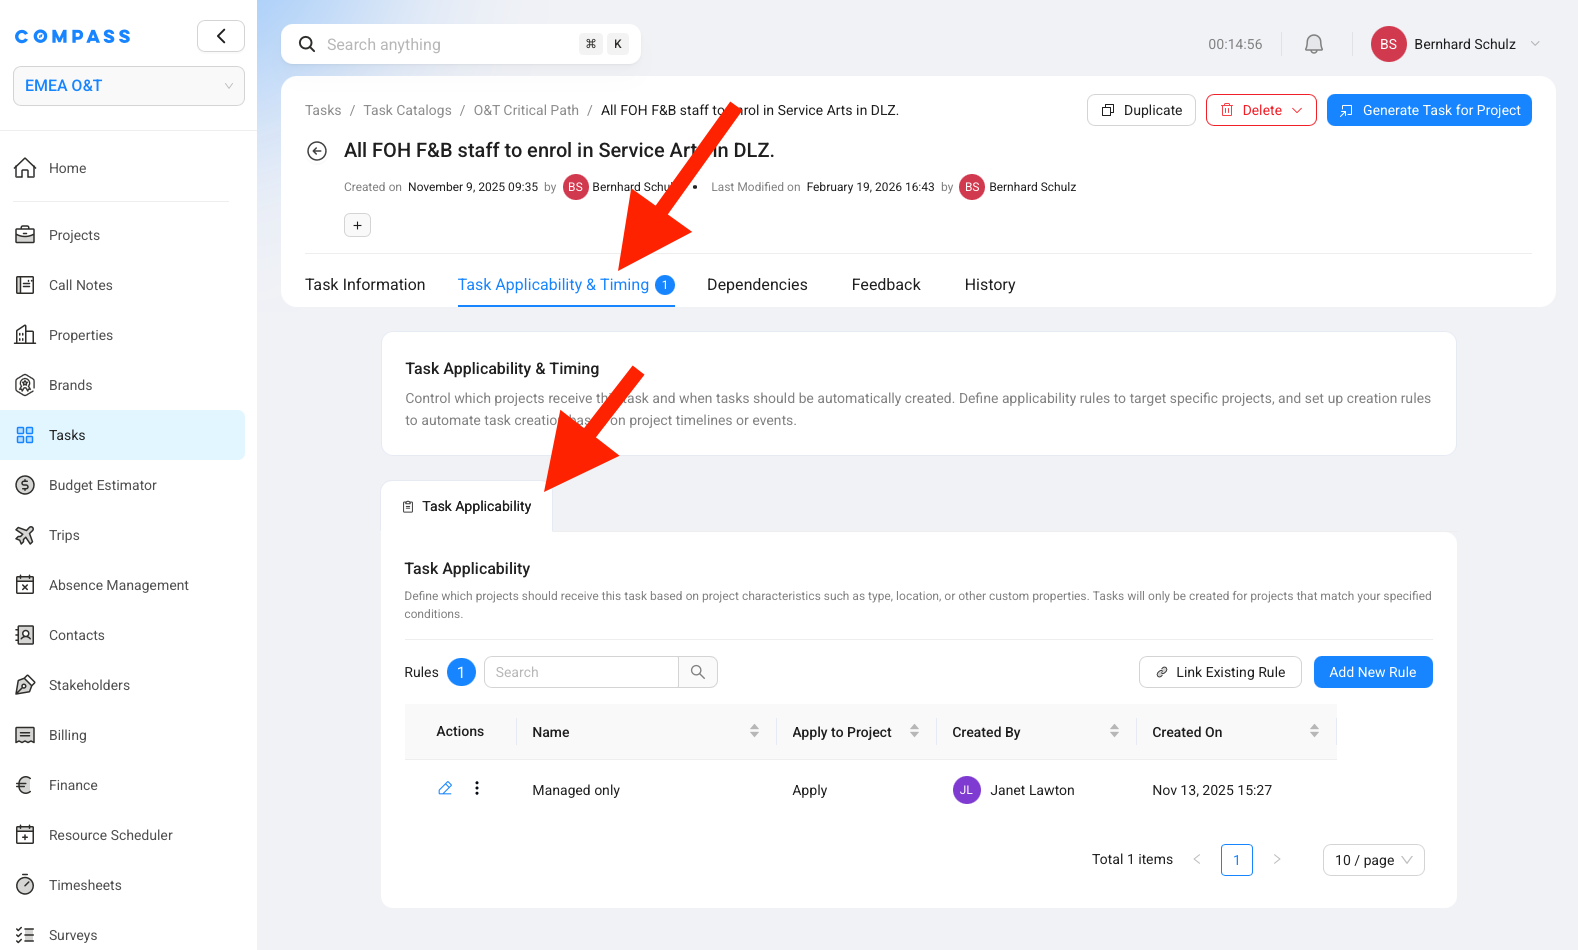
Review assigned rules
Check whether any Applicability Rules are assigned.Add or link a rule if needed
If no rule is assigned, create a new rule or link an existing one that covers this project's scenario.Check that conditions match your project
If a rule is assigned, check its conditions. Does your project actually match? For example, if the rule says "Brand is Marriott" but your project's brand is Sheraton, the rule will not match.Generate the missing task
After fixing the rule, click Generate Task for Project on the catalog item to create the missing task on your project.For a full explanation of how Applicability Rules work and how to create them, see Applicability & Creation Rules.
Step 2: Check that no unexpected tasks are present
Go through the task list and look for tasks that should not be there for this particular project. For example, tasks that only apply to franchised hotels should not appear on a managed hotel project.
If you find tasks that should not be there, the most likely cause:
The Task Catalog Item has "Task applies to any project" selected — meaning it is created on every project, even when it should only apply to certain types.
Found tasks that are not applicable? How to fix — Option A: Fix one item at a time
Open the catalog item
Open the Task Catalog Item for the unwanted task.Switch to project-specific applicability
In the Task Rules & Logic section, change "Does this task apply to any project?" to "Task only applies to some projects".
Open Task Applicability & Timing
Go to the Task Applicability & Timing tab that now appears.
Create or link a rule
Create or link an Applicability Rule that describes when this task should apply — for example, "Owner Type is Franchised".Confirm future behavior
From now on, the task is only generated for projects that match the rule.Found tasks that are not applicable? How to fix - Option B: Fix multiple items at once**
If you have several catalog items that all need the same rule, you can link them in bulk:
Open the catalog Overview
Go to the Tasks module, click the Task Catalogs tab at the top, open your catalog, and stay on the Overview tab (the list of all catalog items).Select the items
Select the checkboxes next to all the items you want to restrict.Open Link Rules
A toolbar appears at the bottom of the list. Click Link Rules.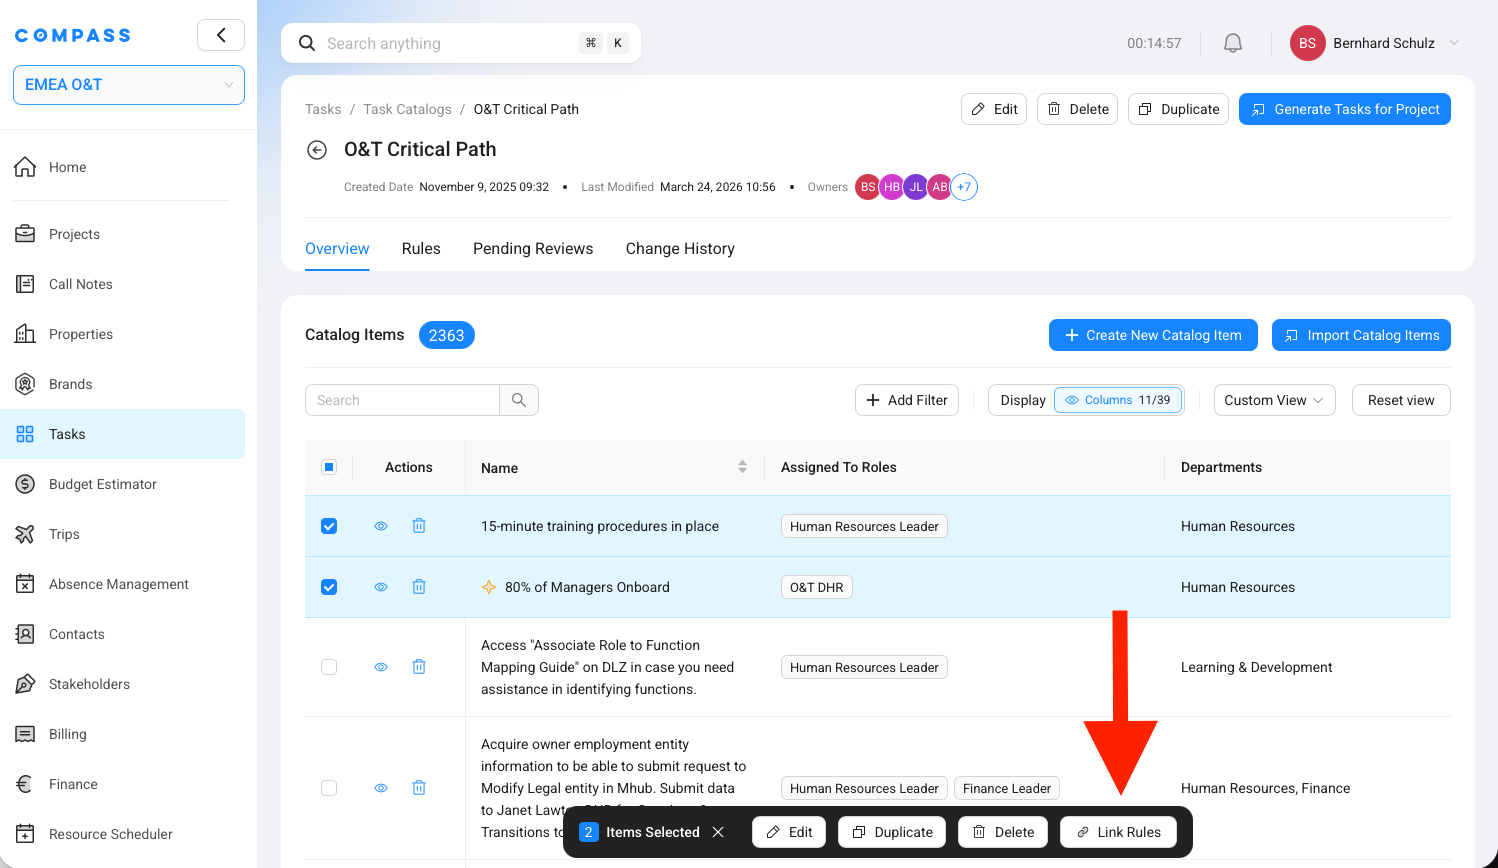
Choose the Applicability tab
In the Link Rules to Catalog Items dialog, go to the Applicability tab.Select the rule
Select the rule you want to link — for example, "Franchise only".Apply
Click Apply.This automatically changes each selected item's setting from "Task applies to any project" to "Task only applies to some projects" and links the chosen rule. You do not need to open each item individually.
Verify your fix
To confirm the fix works:
Remove the old task
Delete the unwanted task from your project's task list.Open the updated catalog item
Go back to the catalog item you just updated.Run generation again
Click Generate Task for Project and select the same project.Confirm the result
The task should not be generated this time, because the project does not match the rule.Step 3: Verify the task content
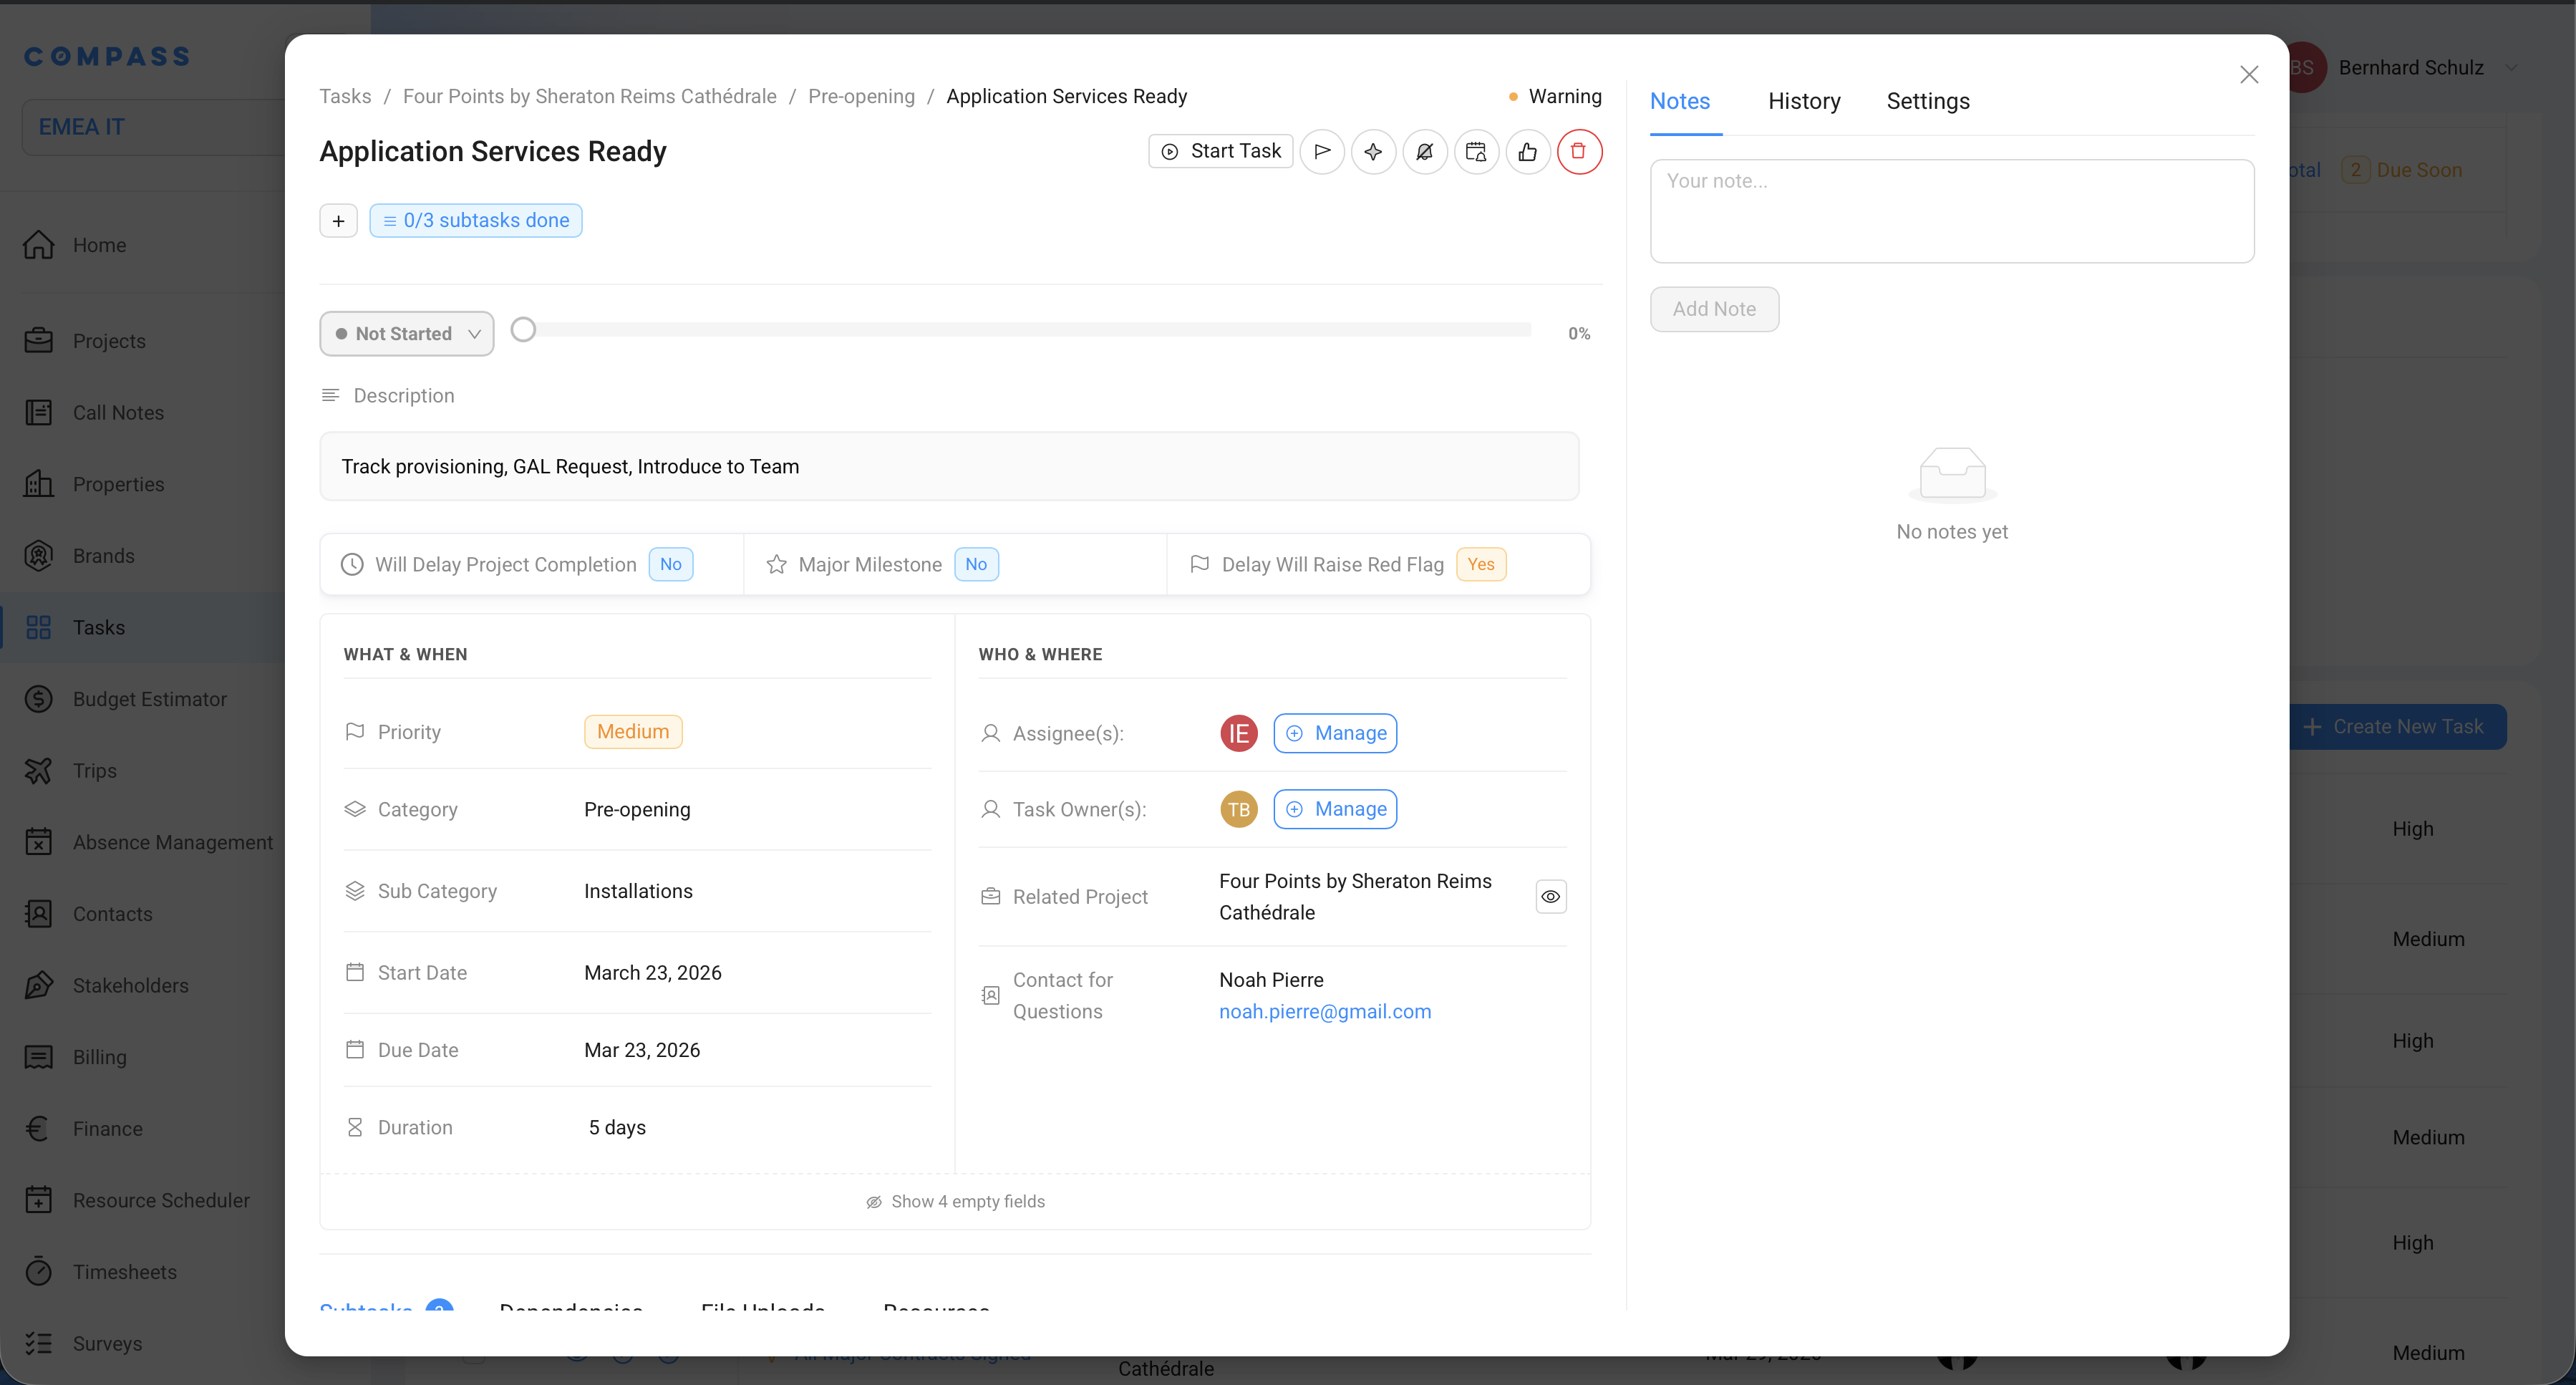
Now that the right tasks are present and the wrong ones are excluded, check whether the content of each task is correct. Open individual tasks and review:
| What to check | Where to find it |
|---|---|
| Title | Top of the task |
| Description | Below the title |
| Priority | In the WHAT & WHEN section |
| Category and Subcategory | In the WHAT & WHEN section |
| Department, Discipline, Team | In the WHO & WHERE section |
| Assignee(s) and Owner(s) | In the WHO & WHERE section |
| Start Date and Due Date | In the WHAT & WHEN section |
| Resources (files and links) | Files and Resources on the task — attachments and URLs configured on the Task Catalog Item |
| Contact for Questions | In the WHO & WHERE section (if configured) |
Verifying dates
Start and due dates are calculated automatically based on the Task Catalog Item's timing settings. Here is how the calculation works:
- The Due Date is set relative to a project reference date (usually the opening date) minus the Lead Time. For example, if the opening date is January 1, 2027 and the lead time is 100 days, the due date is September 23, 2026.
- The Start Date is the due date minus the Duration. If the duration is 30 days, the start date is August 24, 2026 — 130 days before opening.
To see which reference date and lead time a task uses, click Settings in the top right corner of the task detail view. You will see:
- Task Due Date is Relative To — which project date the calculation uses (e.g., "Ops Est Open")
- Lead Time to Reference Date — how many days before that date the task is due
- Adjust Start Date and End Date if Reference Date changes — whether the dates update automatically when the project timeline shifts
Compare these values against what you expect. If the dates look wrong, the issue is likely in the catalog item's timing configuration — the lead time, duration, or reference date field.
This is very important to understand: when you edit a task on a project — changing its title, description, department, dates, or any other field — that change only affects this one task on this one project. It does not change anything in the Task Catalog Item that the task was generated from.
Think of it like this: the catalog item is the template, and the task is a copy. Editing the copy does not change the template.
If you find something that needs to change for all future projects, you must update the Task Catalog Item directly — not the individual task. Any changes you make to the task itself will only apply to this specific project.
When the task content doesn't fit a specific project type
Sometimes the standard version of a task works fine for most projects, but not for all of them. For example:
- The resources attached to the task are specific to one brand, but don't apply to another.
- The task duration is set for a full-service hotel but is too long for a select-service property.
- The assignee or department is right for one region but wrong for another.
In these cases, you don't need to create separate catalog items for each scenario. Instead, you can set up project-based overrides — a built-in feature that lets a single catalog item behave differently depending on the project's details.
How to set up project-based overrides
Open the catalog item
Open the Task Catalog Item that needs project-specific variations.Go to Task Rules & Logic
Scroll down to the Task Rules & Logic section. You'll see a question: "Should this task, if it applies, adjust its parameters based on project details?"By default, this is set to "Task is always the same" — meaning the task always looks identical, regardless of which project it's generated for.
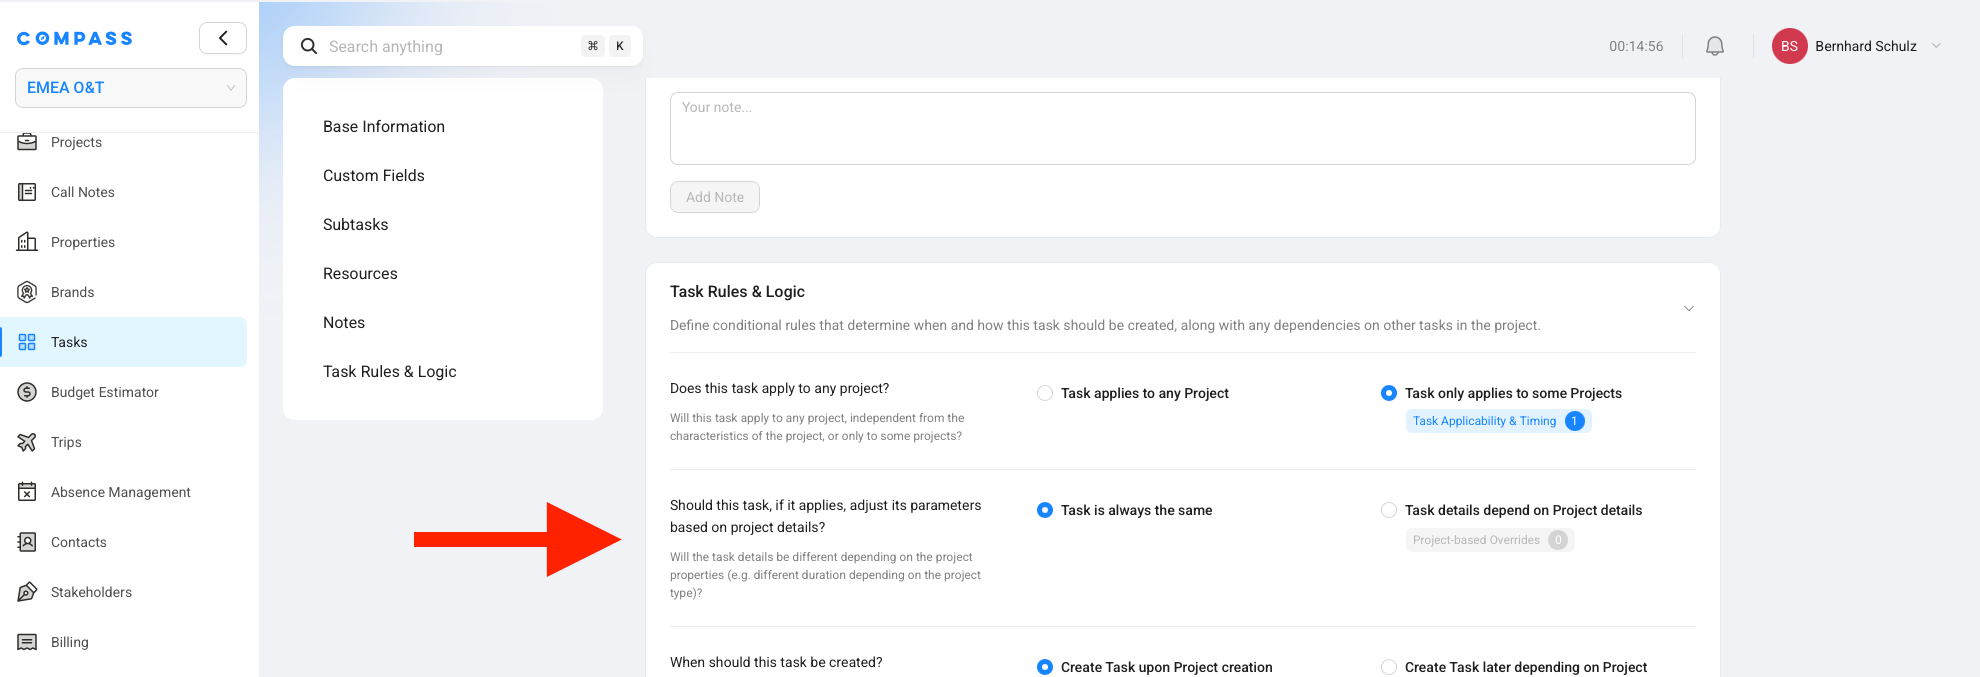
Switch to "Task details depend on Project details"
Click "Task details depend on Project details" on the right side of that question.As soon as you do this, a new tab called Project-based Overrides appears at the top of the catalog item — next to Base Information, Custom Fields, and the other tabs.
Open the Project-based Overrides tab
Click the Project-based Overrides tab. This is where you build a matrix of variations.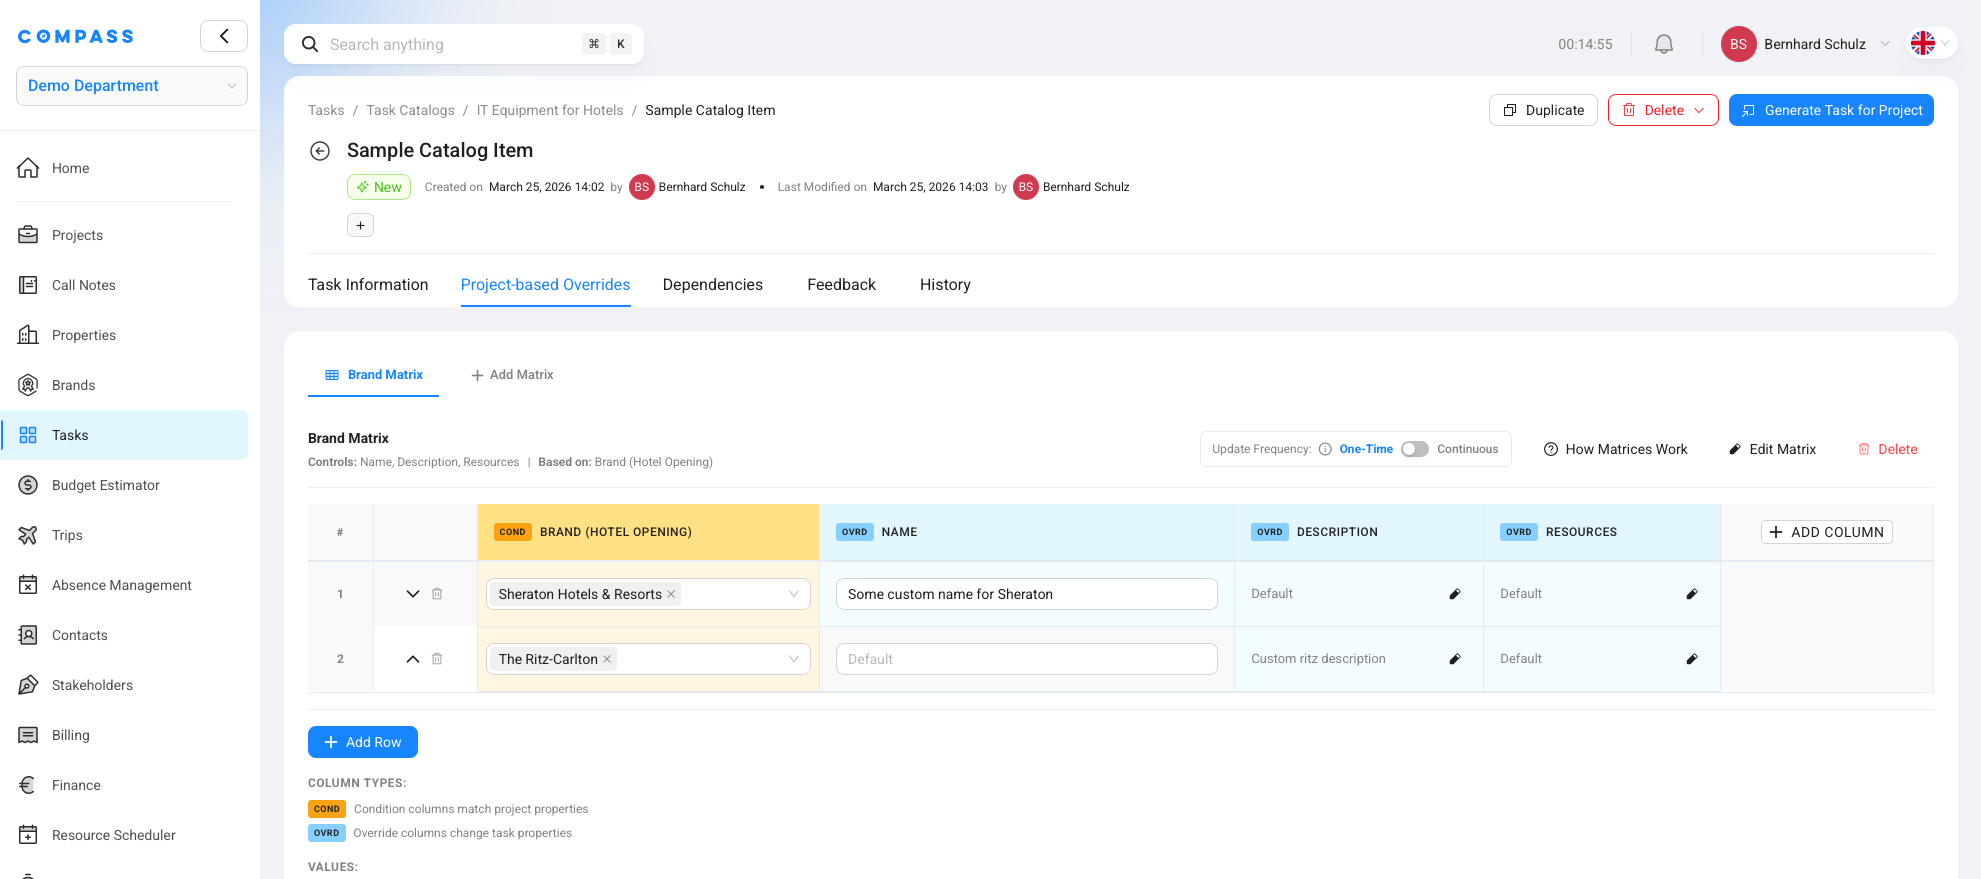
Add your variations
In the Project-based Overrides tab, you can create rows for different project scenarios — for example:- Brand = Marriott → use a different duration or different resources
- Country = Germany → assign to a different team
- Contract Type = Franchise → skip certain attachments
- Service Level = Select Service → shorten the duration
Each row in the matrix defines one scenario and what should be different for that scenario.
For project-based overrides to work, the project you are testing with must have the relevant fields filled in under the Project Details tab of the single project view. For example, if your override is based on Brand, the project's brand field must be set. If that field is empty, COMPASS cannot match the override and will fall back to the standard task values.
For a full guide on building override matrices — including all supported parameters and how to layer multiple conditions — see the Project-based Overrides article.
Applying fixes and re-generating
When you find issues during validation and update the Task Catalog Item to fix them, those changes are not automatically reflected in tasks that have already been generated. To see the effect of your changes, you need to delete the affected task(s) and re-generate them.
Re-generate a single task
Delete the existing task
Delete the task from the project's task list.Open the catalog item
Open the Task Catalog Item you updated.Start generation
Click Generate Task for Project in the top right corner.Pick the project
Select your project.Confirm
The task is re-created with the updated settings.Re-generate all tasks from a catalog
Delete the tasks you want to replace
Delete all generated tasks for the project (or only the ones you want to regenerate).Open the Task Catalog
In the Tasks module, click the Task Catalogs tab, then open the Task Catalog itself (the library), not a single catalog item.Start full catalog generation
Click Generate Tasks for Project in the top right corner.Select the project and generate
Select your project and generate.When you generate tasks, Compass only creates tasks that do not already exist on the project. It does not regenerate or update tasks that are already there. That is why you need to delete first, then regenerate — otherwise the old version of the task stays as it is.
Testing with different project scenarios
Your catalog probably serves different types of projects — different brands, regions, owner types, or hotel categories. To verify that applicability rules work correctly across all scenarios, test with multiple sample projects.
Create a sample project
Open Projects
Go to the Projects module.Create the project
Create a new project with the parameters you want to test — for example, a managed luxury hotel in the EMEA region, or a franchised select-service property in the Americas.Fill in rule-related fields
Fill in the project fields that your rules depend on (brand, owner type, region, category, etc.).Set the target completion date
Fill in the project's target completion date so task dates are calculated correctly.Generate and validate
Generate tasks for the sample project using one of these methods:
- From the project: open the project, go to the Tasks tab, and click Generate Tasks
- From the catalog: in the Tasks module, open the Task Catalogs tab, open your catalog, click Generate Tasks for Project, and select your sample project
Then go to the Task module, set the Filter by Projects filter to your sample project, and run through the same three validation steps:
Missing tasks check
Are all expected tasks present?Unexpected tasks check
Are there any unexpected tasks?Content check
Is the task content correct?Repeat this for each project scenario you need to verify — different brands, regions, or owner types that your rules are designed to handle.
Reporting issues
Content issues
If you find content problems — unclear descriptions, inconsistent use of categories or departments, missing information in tasks — raise these with the team that created and maintains the Task Catalog. These are decisions that need to be discussed internally:
- Which category or subcategory should a task belong to?
- Is the description clear enough for the assignee?
- Are departments, disciplines, and teams assigned consistently?
- Does the priority accurately reflect the task's importance?
The Task Catalog owners are listed on the catalog itself and are the right people to make these decisions.
Technical issues
If you encounter a bug (for example, a task that should be generated based on a correctly configured rule but is not, or dates that do not calculate correctly despite correct settings), or if you have a feature request or improvement suggestion, submit a request through the Apex Customer Portal:
Submit a request on the Apex Customer Portal
Include as much detail as possible: which catalog, which project, which task, what you expected, and what actually happened. Screenshots are always helpful.
Validation checklist
Use this as a quick reference while working through the playbook:
- Dashboard filters set to the right project and scope (department, category, etc.)
- Task list columns and grouping configured for easy scanning
- All expected tasks are present — no missing items
- Missing items traced to either a missing catalog item or a rule issue
- Fixes applied and verified
- No unexpected tasks are present — nothing that should not be there
- Unexpected items traced to missing applicability rules
- Rules linked (individually or in bulk) and verified
- Task content is correct for each task:
- Title and description are clear and accurate
- Priority, category, and subcategory are correct
- Department, discipline, and team are correct
- Assignees and owners are set (or will be assigned via dynamic assignment / Assign by Role)
- Start date and due date are calculated correctly
- Files and links under Files and Resources match what is configured on the Task Catalog Item
- Where content differs by project type, project-based overrides are configured on the catalog item (not as manual edits to individual tasks)
- Fixes made in the Task Catalog Item (not just in the individual task)
- Additional project scenarios tested with sample projects (if needed)
- Content issues documented and shared with the catalog team
- Technical issues submitted via the Apex Customer Portal
Related
- Task Catalogs — how catalogs work and how to manage them
- Task Catalog Items — configuring individual task templates
- Applicability & Creation Rules — controlling which tasks appear for which projects
- Project-based Overrides — building a matrix of variations so a single catalog item behaves differently per project type
- Creating Tasks for a Project — the full generation workflow
- Importing Tasks — bulk-importing catalog items or project tasks
- Working with Tasks — the Task Dashboard and day-to-day task management
- Task Views — List, Gantt & Kanban — different ways to view your task list