Applicability & Creation Rules
Rules are assigned to individual catalog items via the Task Applicability & Timing tab — but that tab only appears after you enable it. In the Task Information tab, go to Task Rules & Logic and set "Does this task apply to any project?" to "Task only applies to some Projects." For Creation Rules, also set "When should this task be created?" to "Create Task later depending on Project progress." Both settings unlock the tab.
Rules are what make Compass task templates smart. A Task Catalog can have hundreds of items, but not every task applies to every project. Rules let you teach Compass exactly which tasks should appear — and when.
There are two types:
- Applicability Rules — should this task be created for this project at all?
- Creation Rules — when should this task be created?
Both are managed in the Rules tab of a Task Catalog, and both can be reused across as many catalog items as you like.
What project fields can you use?
Both rule types use project fields as conditions. You can use any field from the Project Blueprint the catalog is associated with — built-in fields like Brand, Region, and Property Category, plus any custom field you've added to the blueprint.
Whatever information you track on your projects, you can use as a condition in a rule.
Applicability Rules
What they do
An Applicability Rule answers: should this task exist for this particular project?
When tasks are generated for a project, Compass checks each catalog item:
- If the item has "Task applies to any project" turned on → always create it, no rules checked
- Otherwise → check the assigned Applicability Rules. If any rule matches, create the task. If none match, skip it.
Creating a rule
Rules live in the Rules tab of the Task Catalog. Click Add New Rule to open the creation dialog.
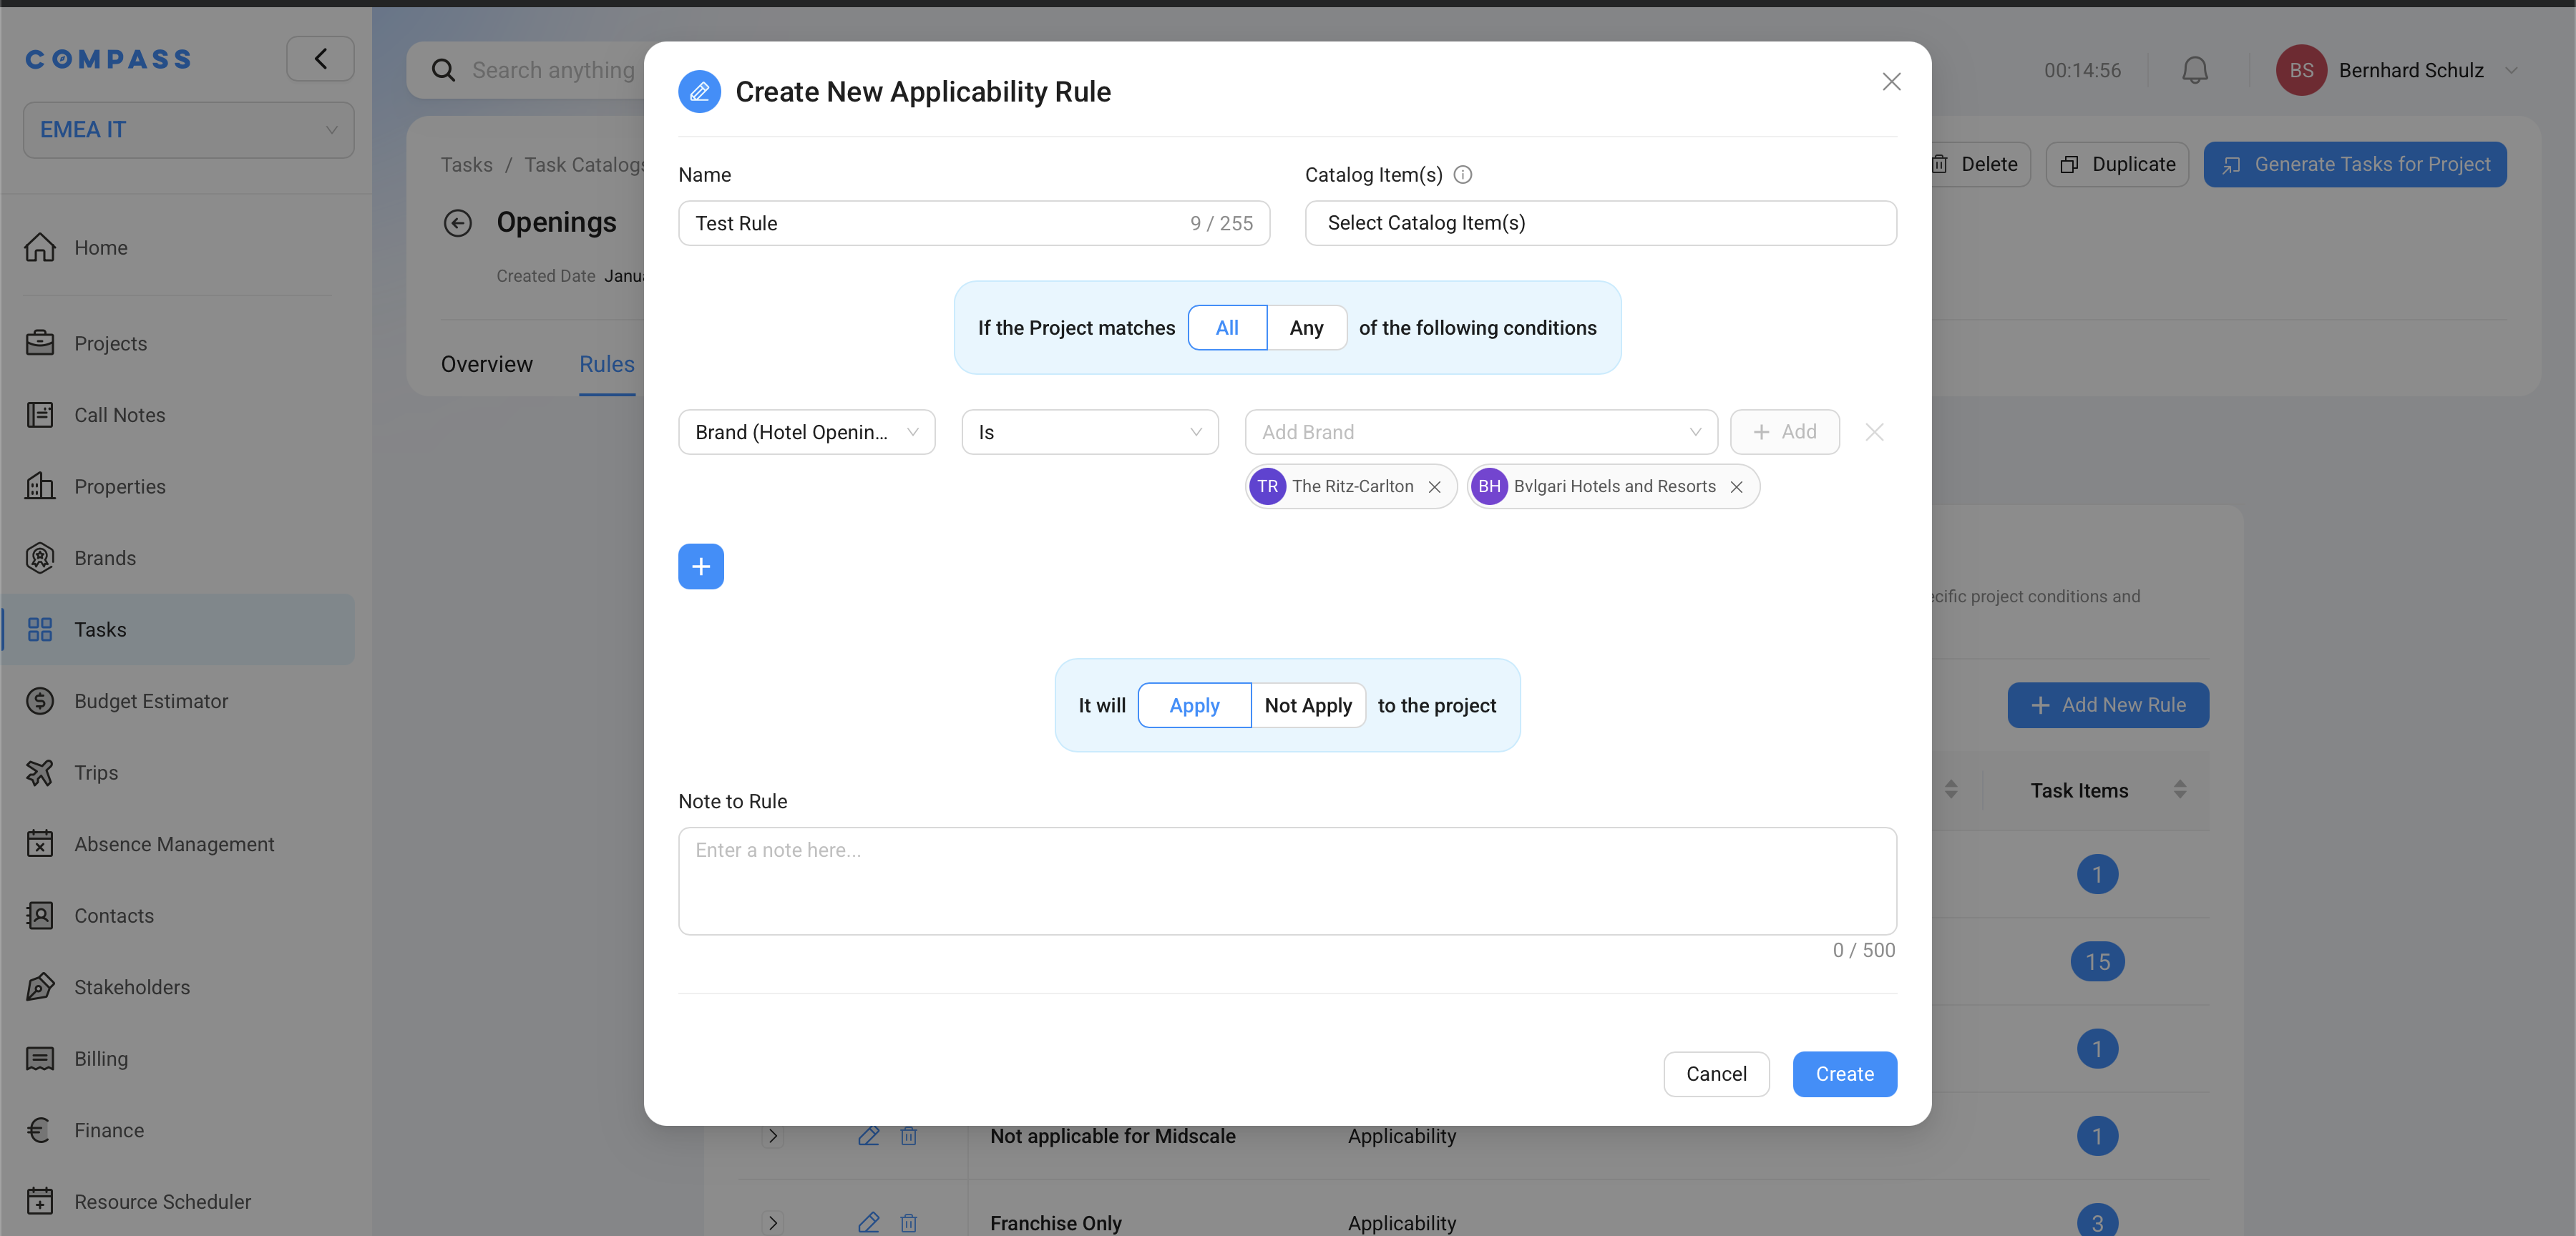
The dialog has four things to fill in:
Name — a clear label you'll recognize later. Example: Luxury Brands Only, EMEA Projects, Franchise Properties.
Catalog Items (top right) — which catalog items this rule should govern. You can select many items at once. This is the key to reusability: define the condition once, link it to 50 tasks, and when the condition changes you update one rule — not 50 items.
Conditions — the project fields and values to check (see below for how the logic works).
Apply / Not Apply — whether a match means "include the task" or "exclude the task" (see below).
Building conditions
The condition builder in the dialog works like this:
One row = one condition. Each row checks one project field against one or more values.
Multiple values in a row = OR within that row. In the screenshot example, the Brand row contains both "The Ritz-Carlton" and "Bulgari Hotels and Resorts." This means: Brand is Ritz-Carlton or Bulgari. If the project's brand is either of these, the condition is met.
Multiple rows = AND between rows (when "All" is selected at the top). If you add a second row — say, Project Type = Full Service — then the rule requires Brand is Ritz-Carlton or Bulgari and Project Type is Full Service. Both rows must be satisfied.
All / Any toggle — controls how rows relate to each other:
- All — every row must match (AND logic)
- Any — just one row needs to match (OR logic)
Apply / Not Apply
This toggle at the bottom of the dialog controls what happens when the conditions match:
| Setting | Conditions match | Result |
|---|---|---|
| Apply | Yes | ✅ Create the task |
| Apply | No | ❌ Skip the task |
| Not Apply | Yes | ❌ Skip the task |
| Not Apply | No | ✅ Create the task |
When to use "Not Apply": use it when it's easier to describe the exception than the rule. For example, "include this task for every project except select-service properties" — create a rule matching select-service properties and set it to "Not Apply."
Examples
Task only for Ritz-Carlton or Bulgari projects
- Condition: Brand is The Ritz-Carlton or Bulgari Hotels and Resorts
- Apply / Not Apply: Apply
- Result: Task appears only on projects with either of those brands
Task only for North America
- Condition: Region is North America
- Apply / Not Apply: Apply
- Result: Task appears only on North American projects
Task for luxury hotels in Europe with a large budget
- All conditions must match:
- Category is Luxury
- Region is Europe
- Estimated Budget is over €50,000,000
- Apply / Not Apply: Apply
- Result: Task appears only for large European luxury openings
Task for everything except select-service
- Condition: Category is Select Service
- Apply / Not Apply: Not Apply
- Result: Task appears on every project except select-service properties
Task for two specific brands (OR across two rules)
You can assign two separate rules to the same catalog item:
- Rule A: Brand is Marriott — Apply
- Rule B: Brand is Hilton — Apply
The task is created if either rule matches. Any other brand → task is skipped.
Tips
One rule, many catalog items. Use the Catalog Items picker when creating a rule to link it to all relevant items at once. When you later need to update the condition, you change one rule and every linked item is updated instantly.
Name rules clearly. "Luxury Brand Properties" is useful. "Rule 1" is not. Future catalog maintainers will thank you.
Add a note. The Note field is for explaining why the rule exists. "Franchise properties handle this task internally — exclude them" is far more useful than just the conditions.
Creation Rules
What they do
A Creation Rule answers: when should this task first appear?
By default, a task is created the moment someone generates tasks for a project. A creation rule defers that moment — the task doesn't appear until specific conditions are met.
The reason: task lists can get overwhelming. A hotel opening project might run for two years. Creating all 300+ tasks on day one means the team is looking at 250 tasks that aren't relevant for another 18 months. Creation rules let tasks appear at the right moment — keeping lists focused and manageable.
Two types of creation rules
Time-dependent — create the task a set number of days before a project date.
You specify:
- Time offset: how many days before the reference date to create the task
- Reference point: which project date to count from — Primary Completion Date, Secondary Completion Date, Risk-Adjusted Date, or any custom date field from the blueprint
Example: "Train Front Desk Staff on PMS System" is irrelevant two years before opening. Set a time-dependent rule with offset = 90 days, reference = Primary Completion Date. The task stays hidden until 90 days before the opening date — then appears automatically, fully configured with the right dates and assignees.
Event-based — create the task when a specific project field changes to a specific value.
You specify:
- Fields to watch: which project fields to monitor
- Condition: what value triggers creation
Example: Don't create "Post-Construction Punch List Review" until construction is done. Set an event-based rule watching the Construction Status field, triggering when it changes to "Complete." The moment someone marks construction as complete, the task appears automatically.
Tips
Use time-dependent rules for phase-gated work. If you can say "this work doesn't start until X days before opening," a time-dependent rule is the right tool.
Use event-based rules for sequential phases. If Phase 2 tasks genuinely can't start until Phase 1 is done, tie their creation to a Phase 1 status field. Tasks appear automatically when Phase 1 is complete — no manual coordination needed.
Don't defer too aggressively. Some tasks need planning lead time even if the actual work starts late. Think about when "created" means people need to start thinking about it, not just when they need to start doing it.
Where rules live in Compass
Rules are managed at the Task Catalog level, in the Rules tab. A rule belongs to its catalog and can be assigned to any number of items within that catalog.
This separation is intentional: you define the condition logic once, centrally, and then link it to as many task items as need it. When the business logic changes, you update the rule in one place.
How to find all Task Catalog Items linked to a rule
In Compass, applicability is controlled by shared Applicability Rules, not by typing the condition separately into each Task Catalog Item. Think of a rule like a label with logic behind it. A rule such as Franchised Only, Managed Only, or Ritz-Carlton Only can be linked to many Task Catalog Items at the same time.
This means there are two easy ways to answer the question, "Which Task Catalog Items only apply to franchised properties?"
Option 1: Open the rule itself
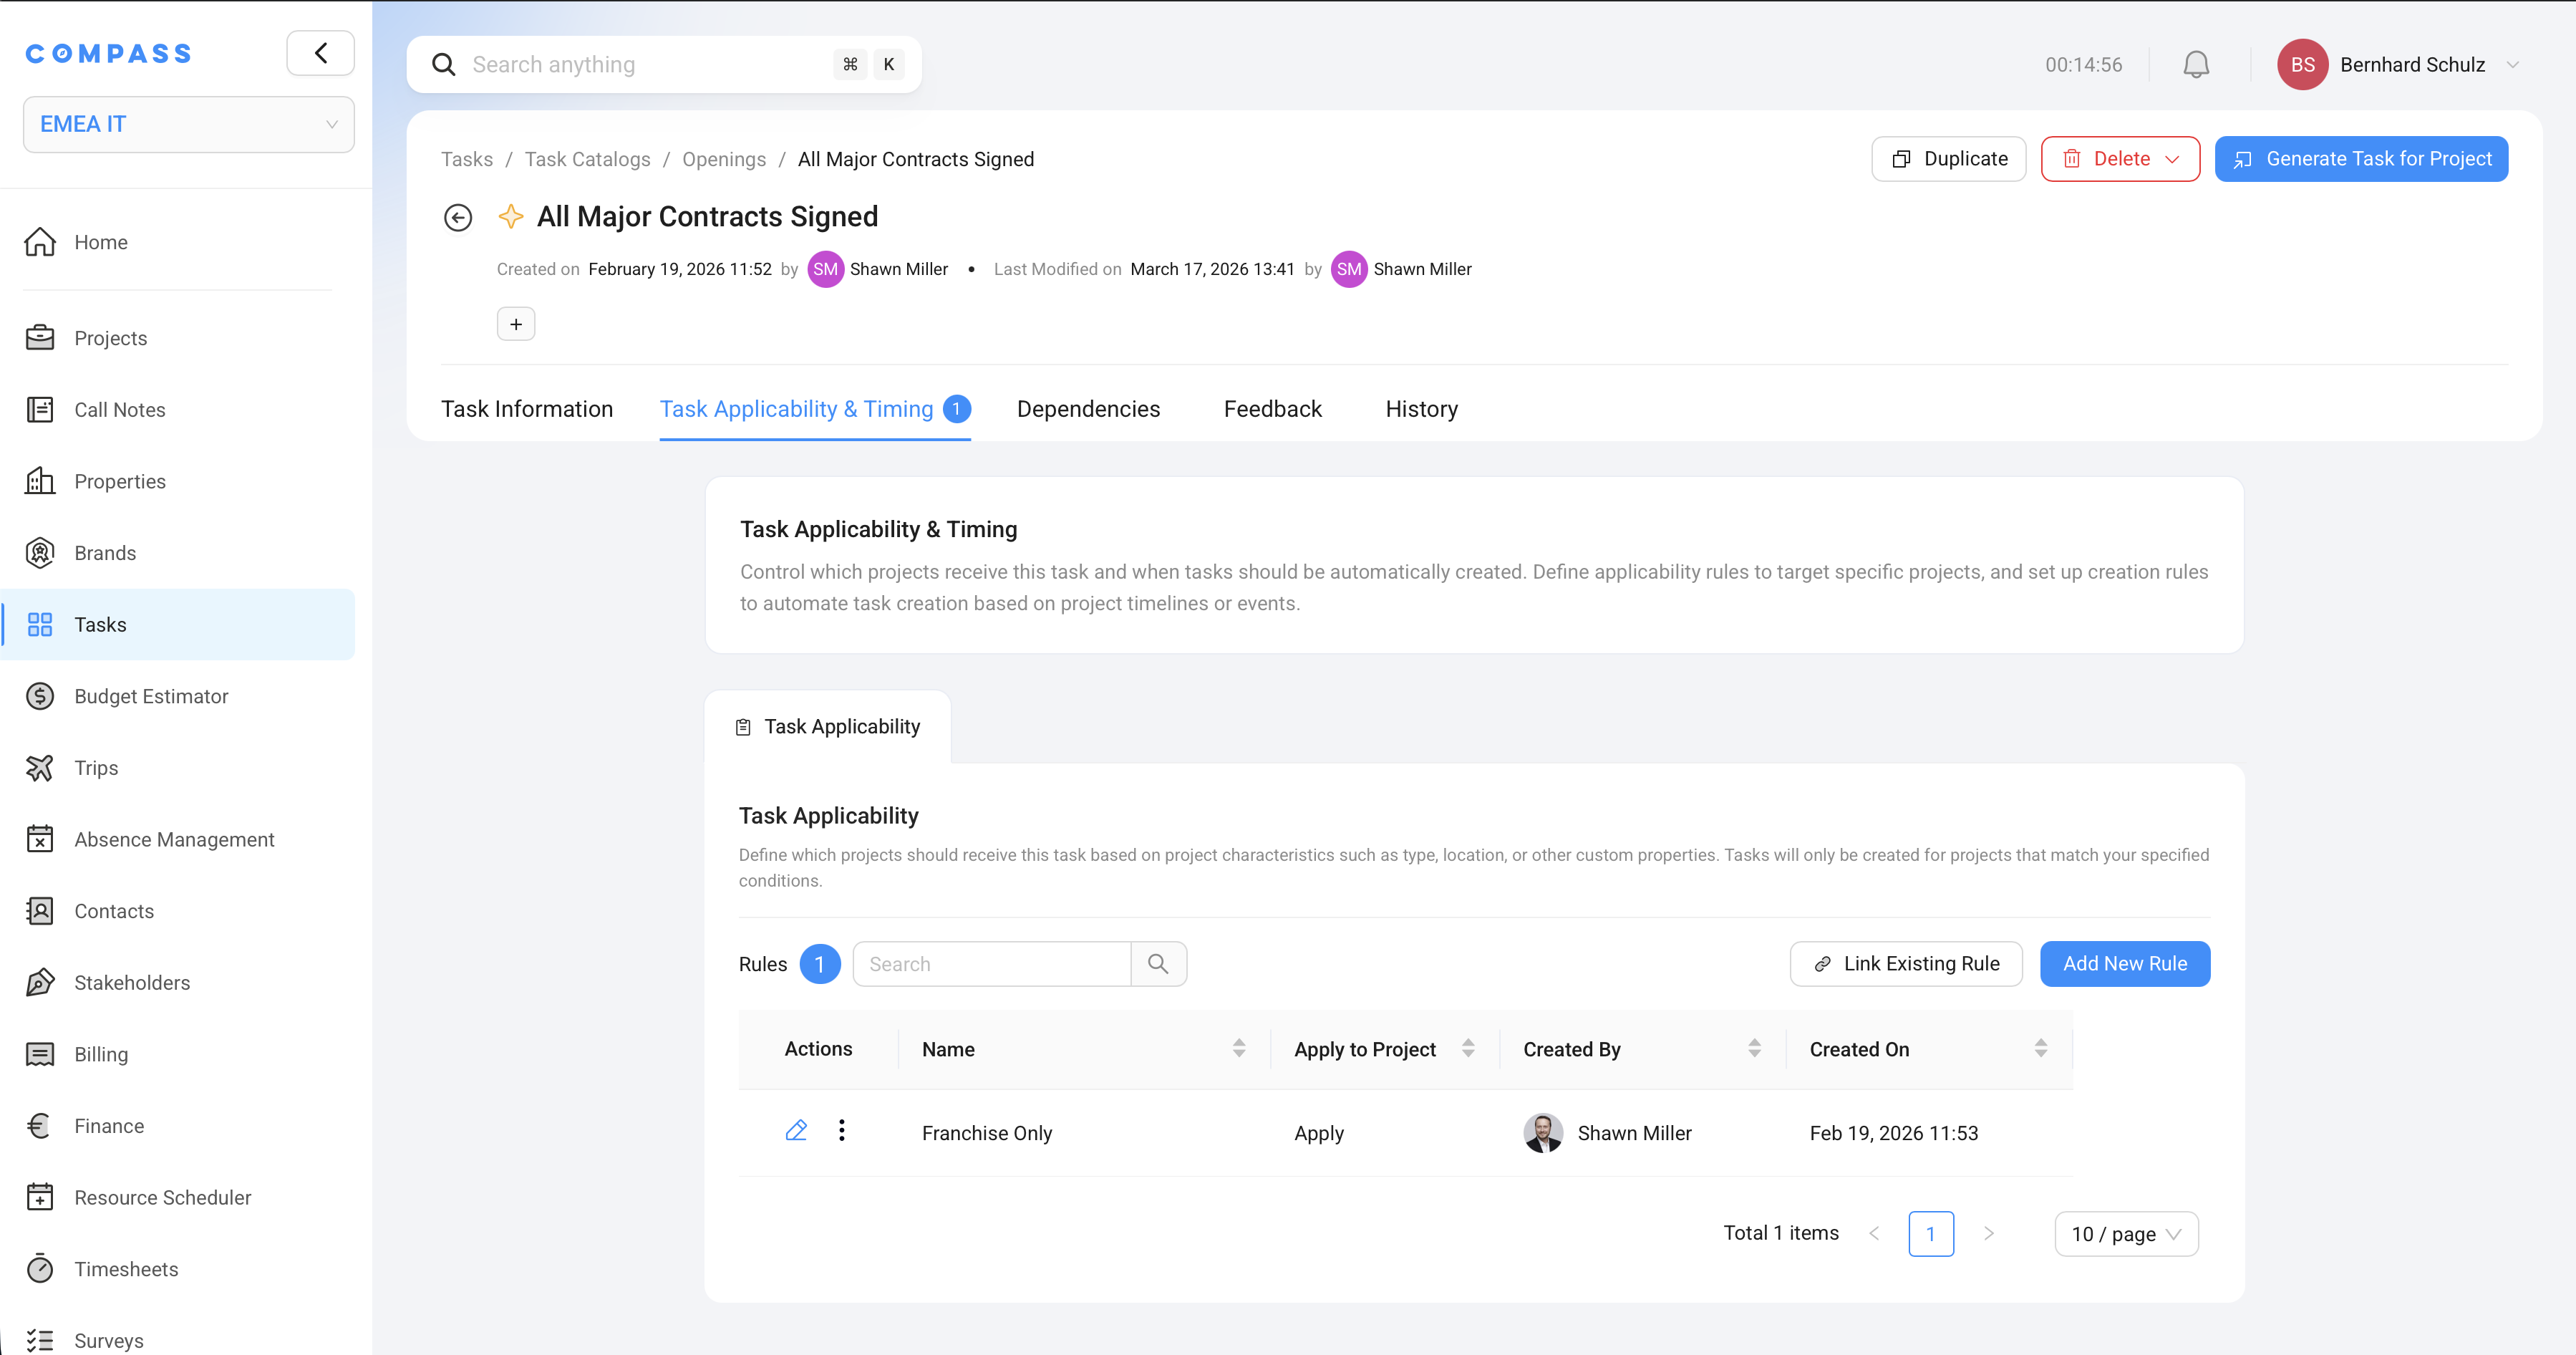
If you already know the rule name, go to the Rules tab in the Task Catalog and open the Applicability Rule, such as Franchised Only. The rule shows the Task Catalog Items linked to it. Those linked items are the tasks Compass checks against that rule, so they are the tasks that only apply when the project matches that rule.
Example: Open the Applicability Rule
Franchised Only. The linked items list shows every Task Catalog Item that Compass only creates for franchise properties.
Option 2: Filter the Task Catalog Item list by rule
If you want to stay in the catalog item list, use Add Filter on the Task Catalog overview. Filter the Applicability Rules field or the Creation Rules field, then select the rule you want to inspect.
Example: Add a filter where Applicability Rules contains
Franchised Only. The list then shows every Task Catalog Item linked to that rule.
You can use the same approach for creation timing.
Example: Add a filter where Creation Rules contains
90 Days Before Opening. The list then shows every Task Catalog Item that is created by that timing rule.
Why this matters
Filtering by linked rules helps you check your catalog logic without opening items one by one. It is the fastest way to review all tasks tied to a brand rule, owner type rule, or timing rule and confirm that the right tasks will be used for the right projects.
The Task Applicability & Timing tab only appears when you enable it
The Task Applicability & Timing tab — where you assign rules to a specific catalog item — is only visible when you've told Compass that this task doesn't apply to every project.
To unlock it:
- Open the Task Catalog Item and go to the Task Information tab
- In the Task Rules & Logic section, find the question "Does this task apply to any project?"
- Select "Task only applies to some Projects"
The tab will then appear. The same logic applies to Creation Rules: the creation timing options become available when you select "Create Task later depending on Project progress" in the same section.
If you don't see the Task Applicability & Timing tab on a catalog item, check those two settings first.