Task Catalog Items
A Task Catalog Item is one task definition inside a Task Catalog. Think of it as a recipe card: it describes what the task is, who should do it, when it's due, and whether it even applies to the project at hand. When you generate tasks for a project, Compass reads all the active items in the catalog and turns the ones that apply into real tasks on your project.
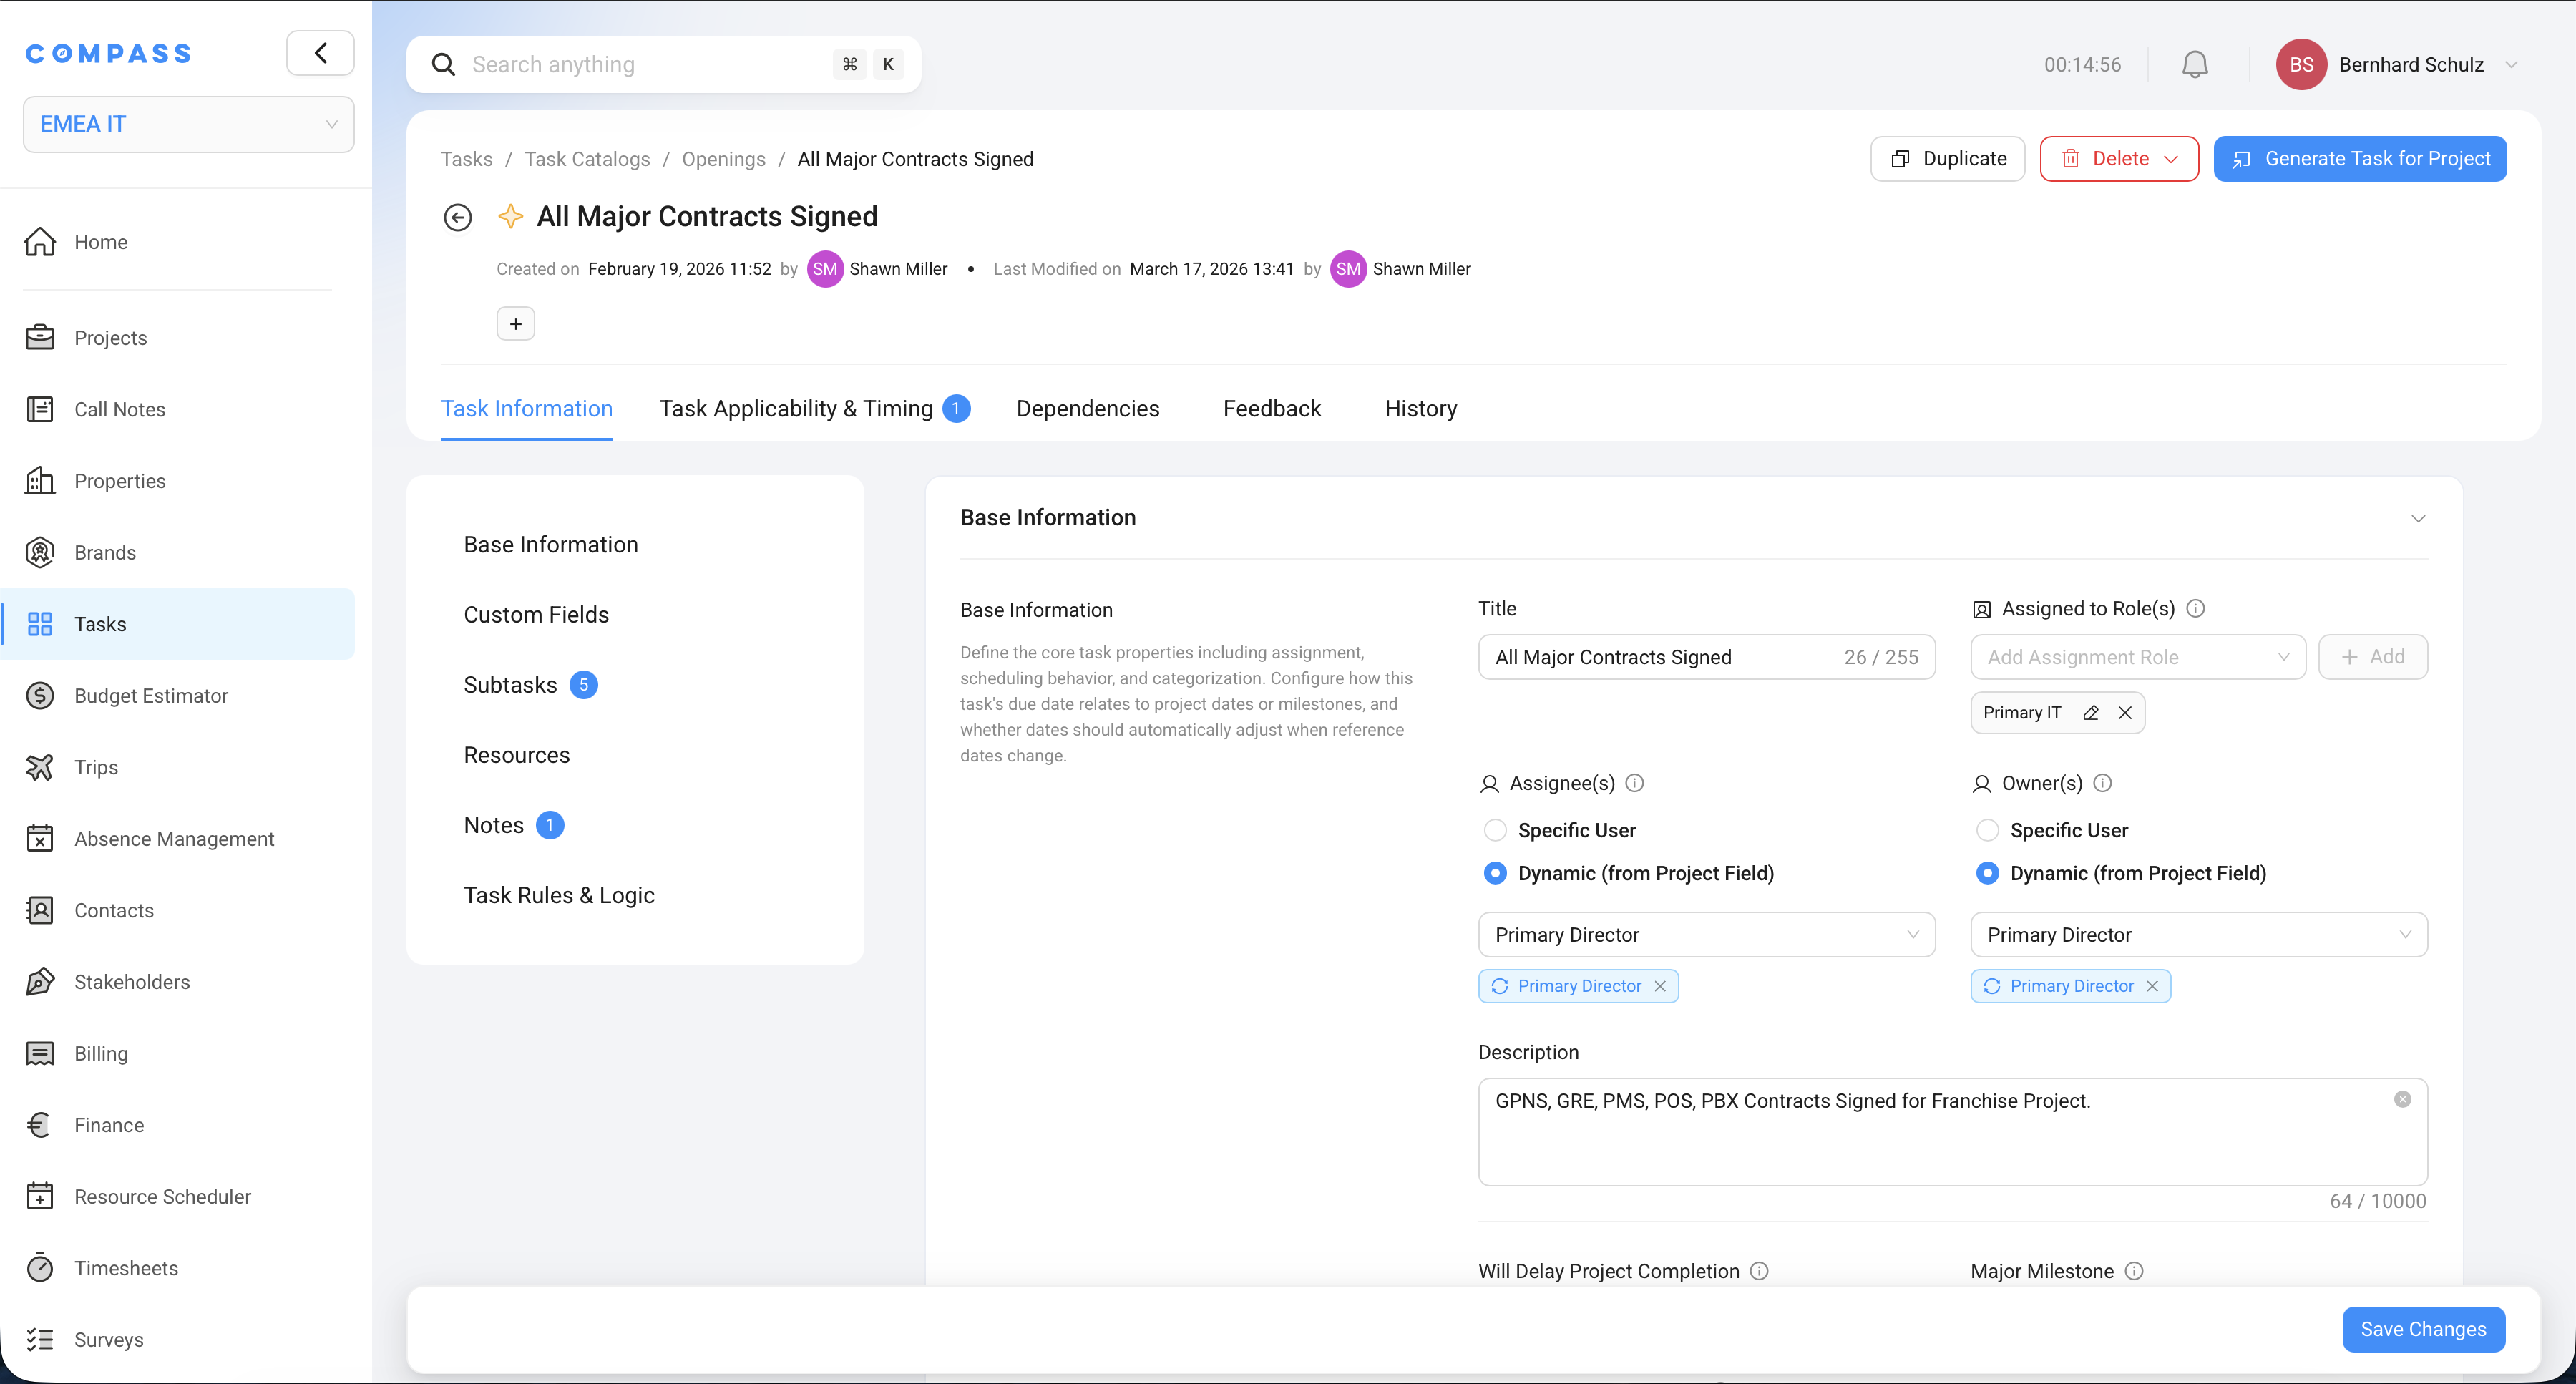
Basic Information
Every catalog item starts with a few straightforward fields.
Title — the name of the task. This becomes the task name on the project. Make it action-oriented and specific so the person doing it knows exactly what's expected:
- ✅ Submit Fire & Safety Inspection Report
- ✅ Finalize Guest Room FF&E Installation
- ❌ Safety (too vague — what exactly needs to happen?)
Description — a full explanation of the task: what needs to be done, what the outcome looks like, and anything the assignee should know before starting. This is the place to be detailed.
Category and Subcategory — labels that group similar tasks together, making them easier to find and filter. Examples: Construction / Interior, Pre-Opening / Staffing, Technology / PMS.
Priority — how urgent the task is. Your workspace will have its own priority levels configured (e.g., Low, Medium, High, Critical).
Status — controls whether the item is used when generating tasks:
| Status | What it means |
|---|---|
| Draft | Still being worked on — not used in task generation yet |
| Pending | A collaborator submitted it for review — waiting for an Owner to approve |
| Active | Approved and live — this item will be evaluated for every project |
| Rejected | Reviewed and declined — won't be used |
Only Active items generate tasks. You can work on items in Draft without affecting any live projects.
Task Rules & Logic
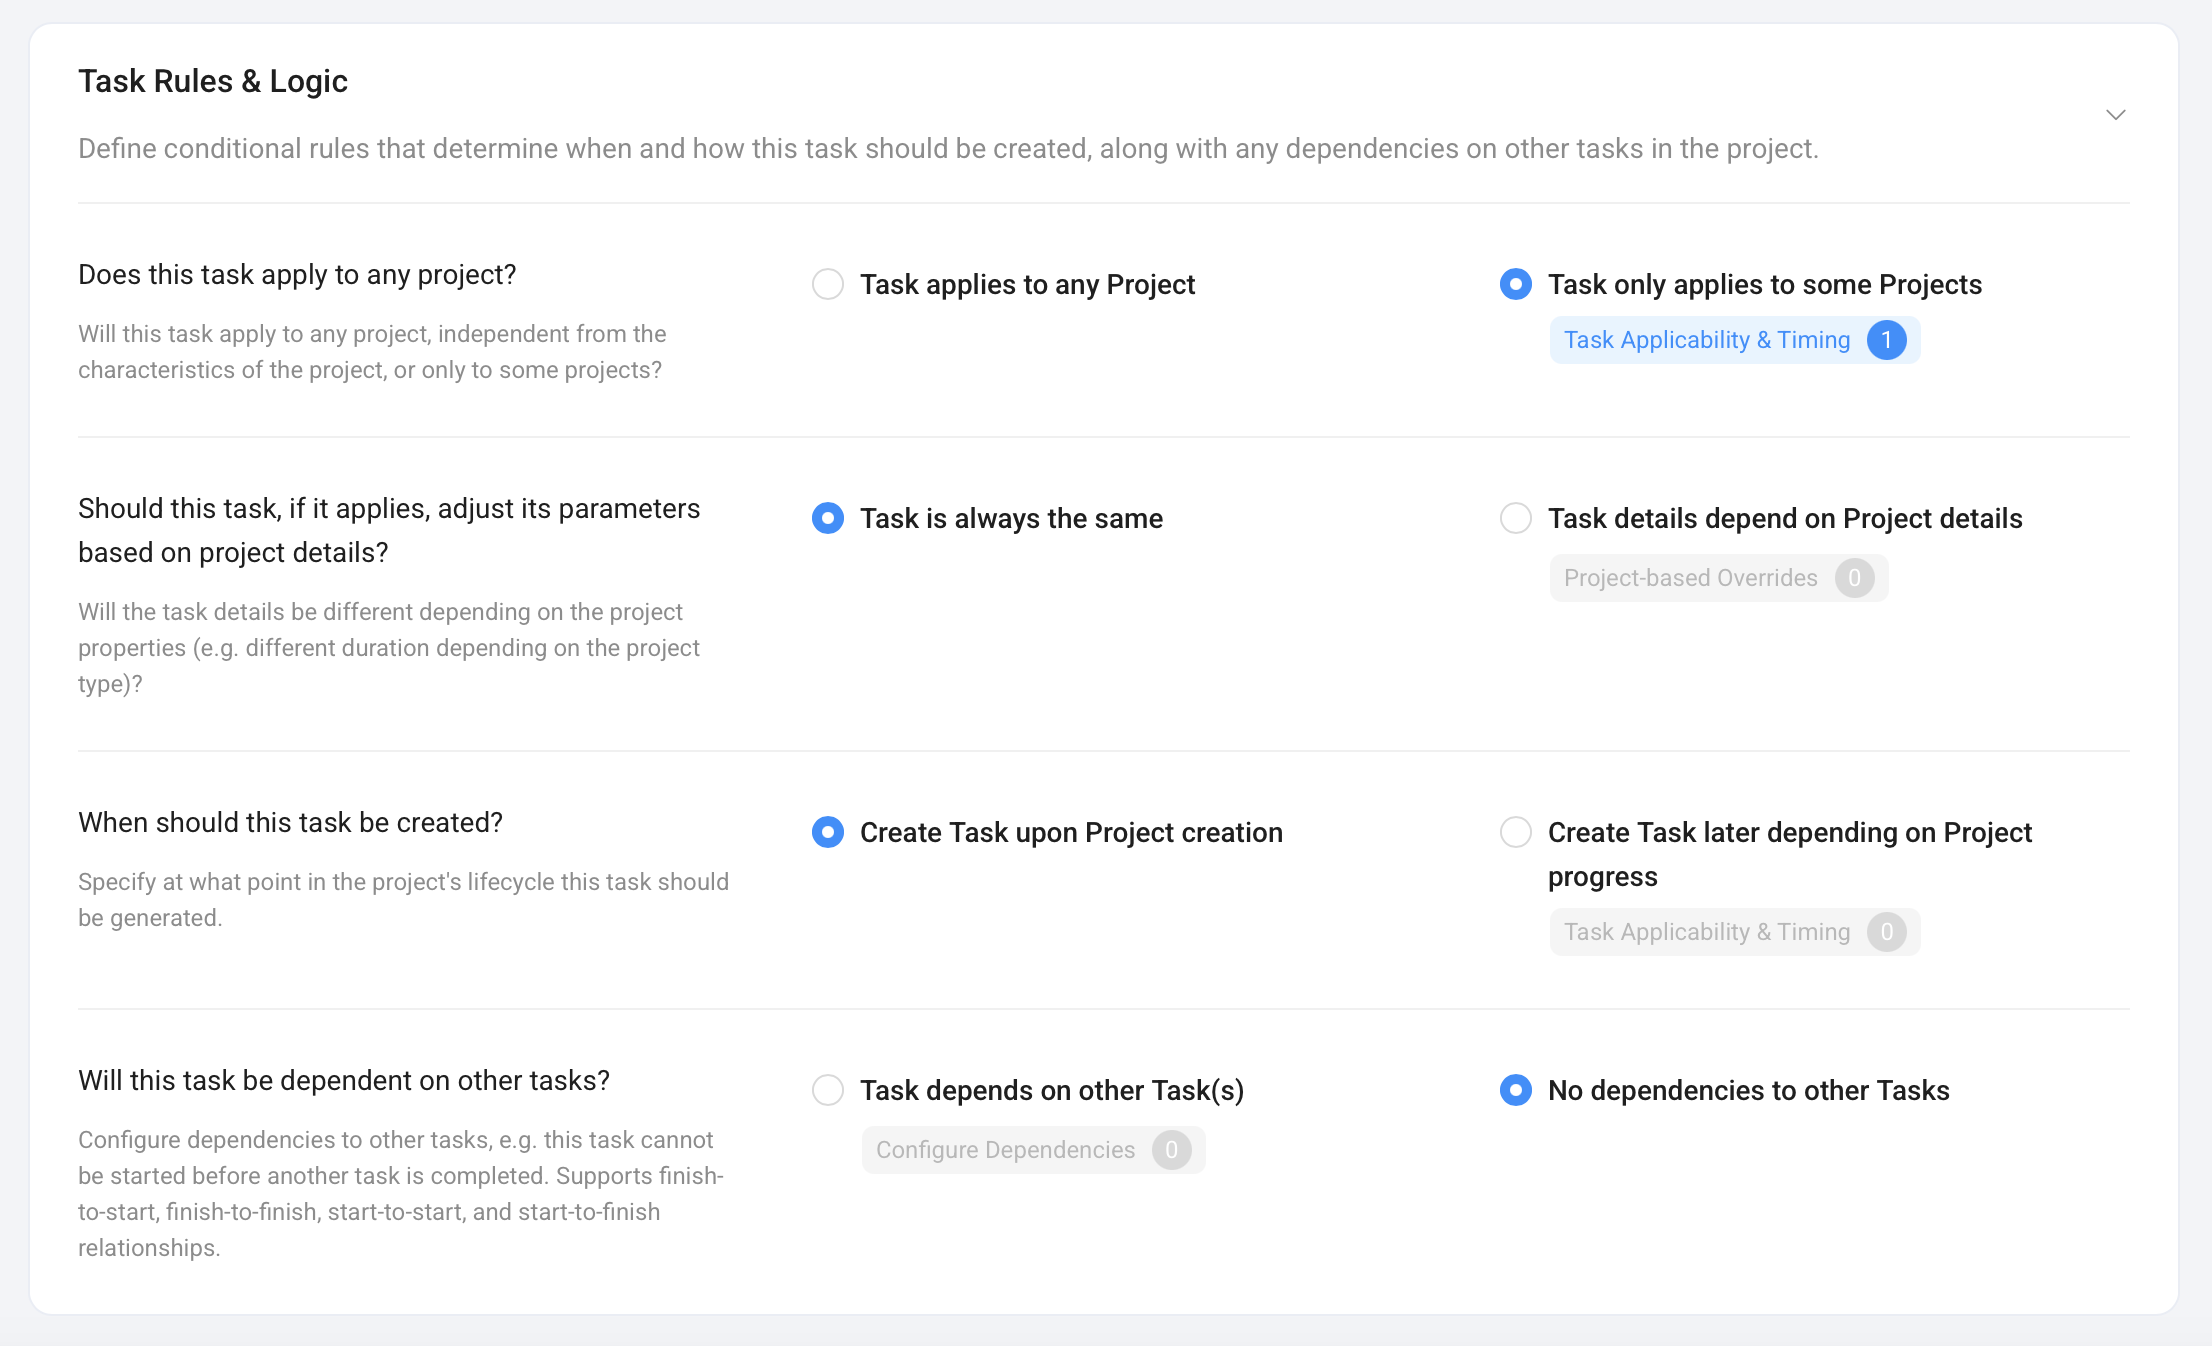
This section is where you make the task intelligent. It answers four questions:
Does this task apply to any project?
"Task applies to any project" — choose this if the task should always be created, no matter what kind of project it is. Good for universal tasks like "Set up project folder" or "Schedule kickoff call."
"Task only applies to some projects" — choose this to add conditions. You set up rules that tell Compass: only create this task if the project matches certain criteria. You can use any field from the Project Blueprint as a condition — brand, region, property category, or any custom field you track.
Example: The task "Submit Marriott Brand Standards Report" should only appear on Marriott projects. You create a rule: if Brand = Marriott, include this task. For any other brand, Compass skips it.
Once you choose "Task only applies to some Projects," the Task Applicability & Timing tab appears on the catalog item. That's where you assign specific rules to this item. If you don't see the tab, check that this option is selected.
See Applicability & Creation Rules for a full explanation with examples.
If you want to review all items tied to one rule, go back to the Task Catalog item list and filter by Applicability Rules. For example, filtering by Franchised Only shows every Task Catalog Item linked to that rule.
Should this task adjust its details based on the project?
"Task is always the same" — the task is generated identically for every project. Same duration, same subtasks, same resources.
"Task details depend on Project details" — the task adapts based on the project's properties. You set up a Project-Based Override (a table of conditions and adjustments) that tells Compass: for a luxury property, use these settings; for a select-service property, use different ones.
Example: The "Pre-Opening Review" task takes 60 days at a luxury property but only 14 days at a select-service hotel. You configure a Project-Based Override so Compass automatically sets the right duration based on the project's category.
Once you choose "Task details depend on Project details," the Project-Based Override tab appears on the catalog item. That's where you build and manage your override matrices. If you don't see the tab, check that this option is selected.
More detail in the dedicated Project-Based Overrides article.
When should this task be created?
"Create Task upon Project creation" — the task is created as soon as someone generates the task list for the project. This is the default, and it's the right choice for most tasks.
"Create Task later depending on Project progress" — the task isn't created right away. Instead, a Creation Rule controls when it appears. This keeps task lists clean by only surfacing work when it's actually coming up.
Example: "Train Front Desk Staff on PMS System" isn't relevant two years before opening. You set a creation rule so this task only appears 90 days before the target opening date — right when training needs to start.
See Applicability & Creation Rules for details on both time-based and event-based creation rules.
You can also filter the catalog item list by Creation Rules to review every task linked to the same timing rule.
Will this task be dependent on other tasks?
Turn this on if this task can only start (or finish) once another task has reached a certain state. You configure the specific dependency — which task this one is waiting for, and how they're linked.
Example: "Configure Kitchen POS System" can't start until "Install Kitchen Equipment" is finished. You add a dependency so the team sees that this task is waiting.
See Task Dependencies for the full explanation.
Timing
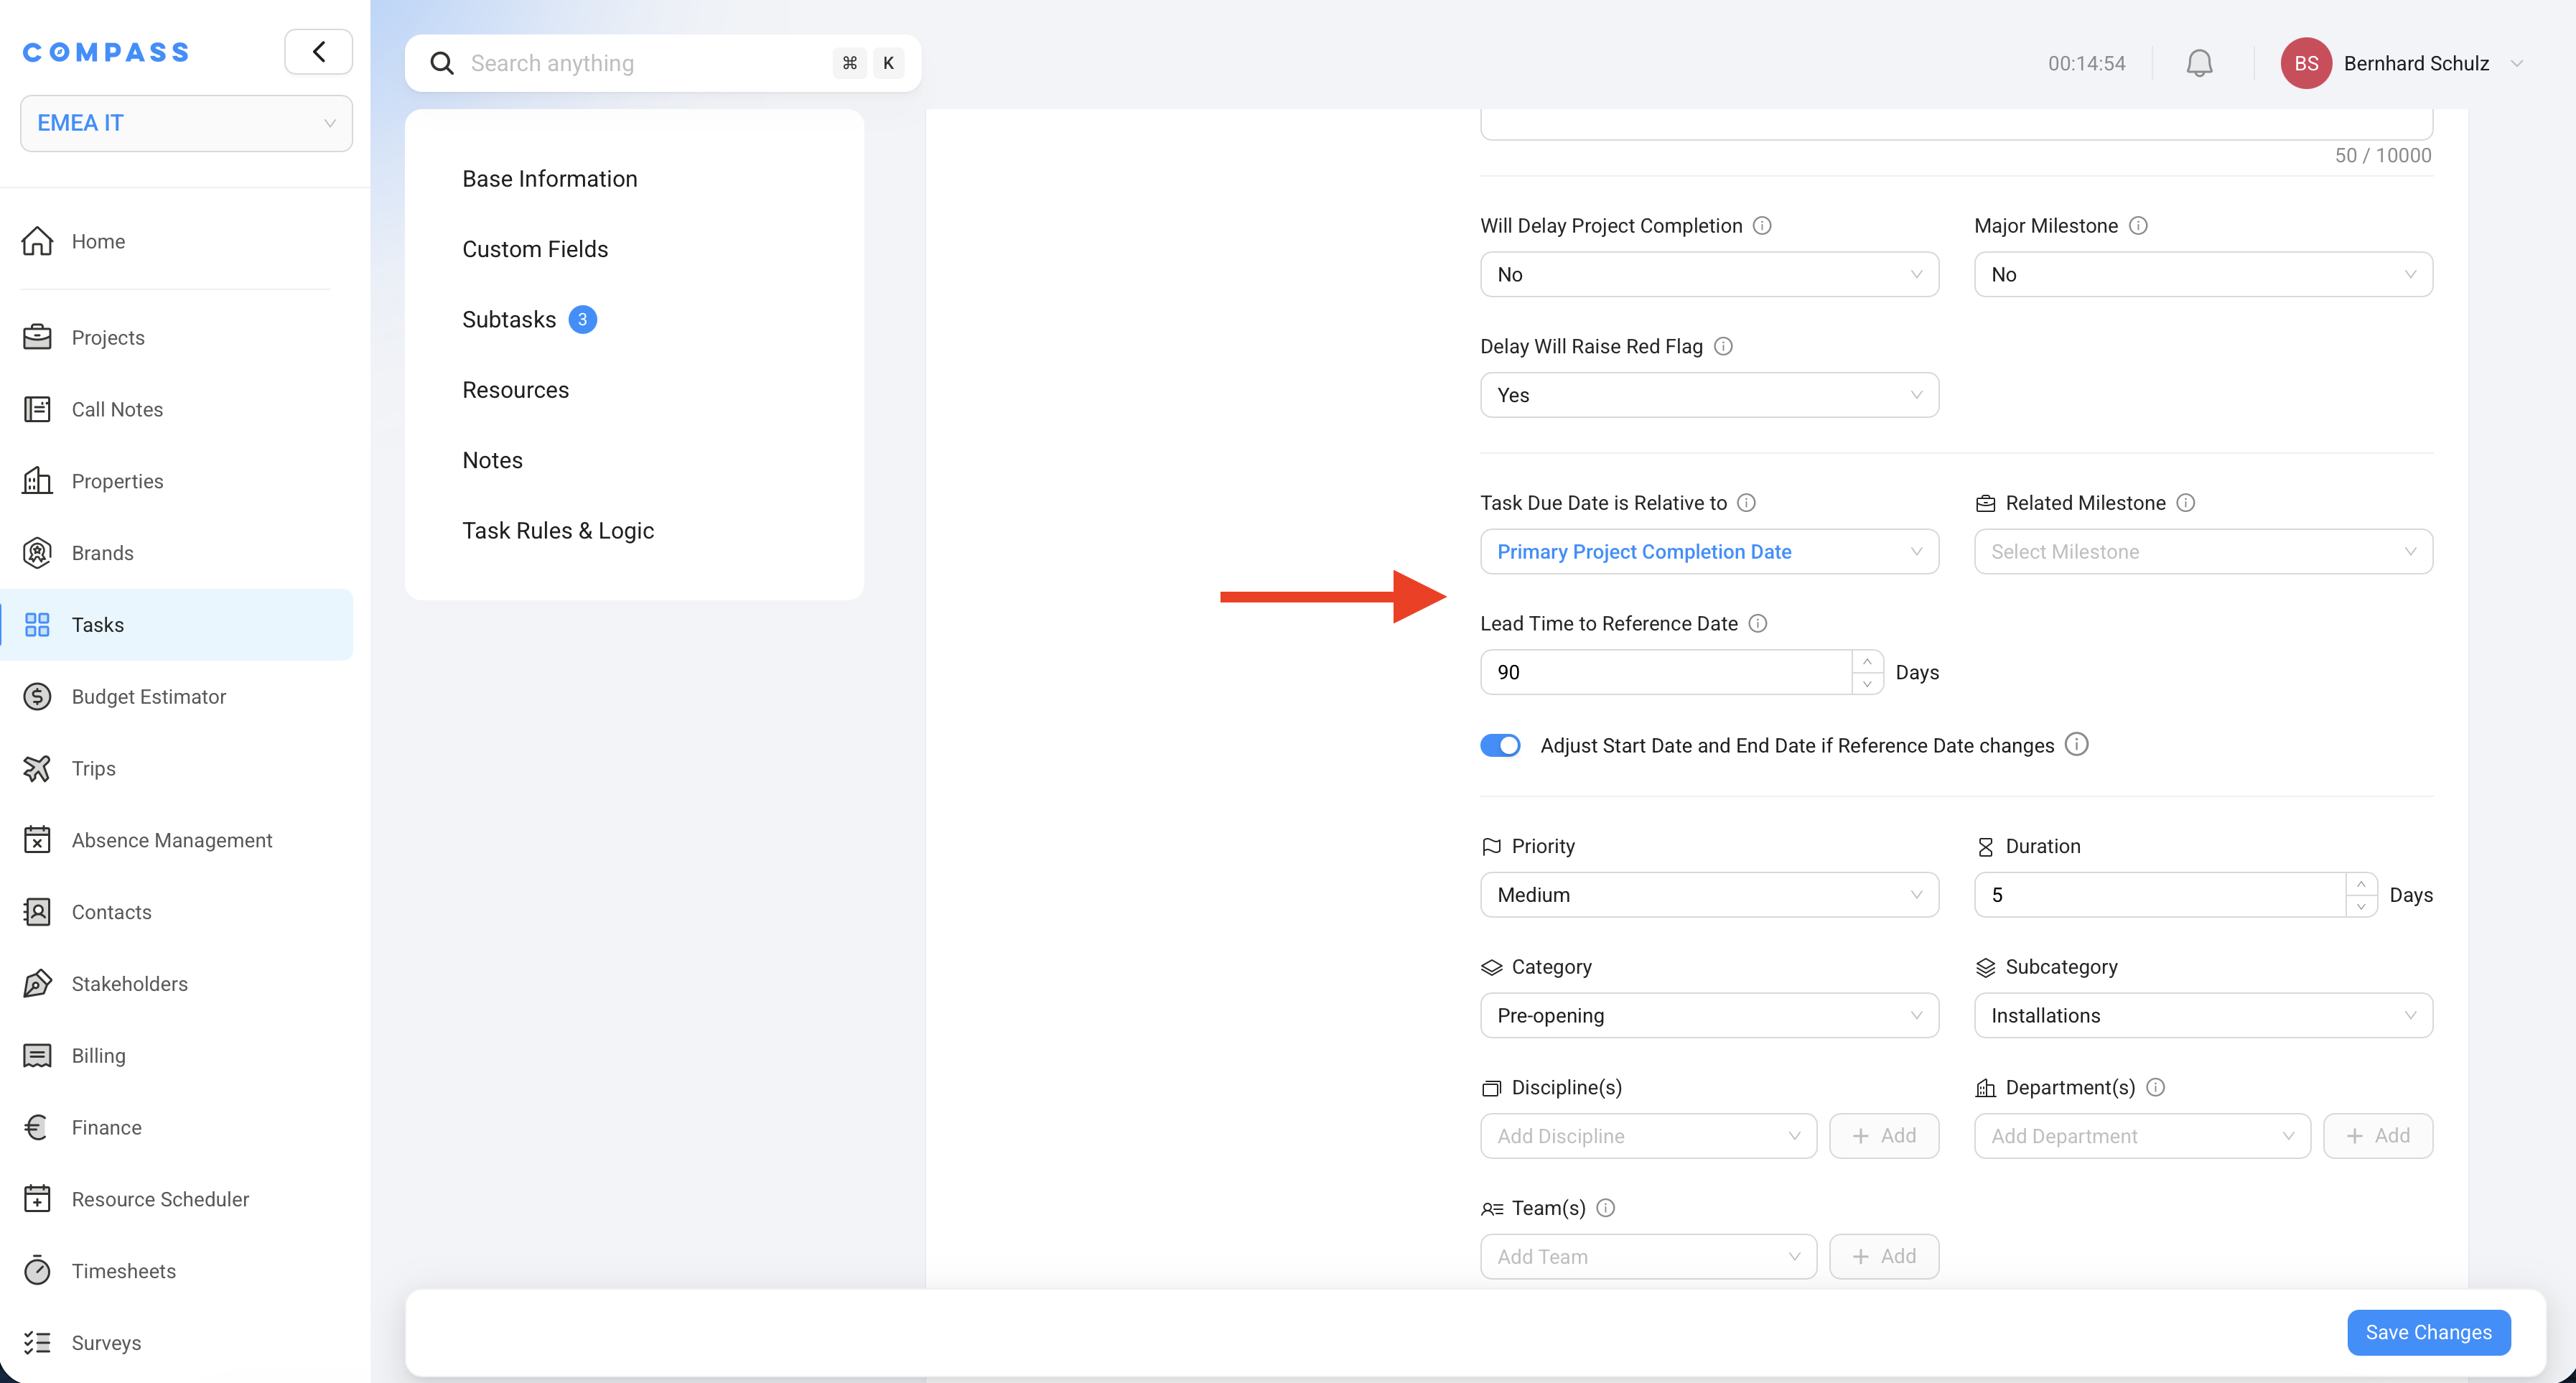
Task Catalog Items use relative dates — instead of entering a fixed date, you describe when the task should happen in relation to the project's timeline. Compass calculates the actual dates automatically when tasks are generated.
What is the due date relative to?
Choose the reference point that the task's due date is calculated from:
| Option | What it means |
|---|---|
| Primary Target Completion Date | The main opening/completion date of the project |
| Secondary Target Completion Date | A second target date (e.g., soft opening vs. hard opening) |
| Risk-Adjusted Completion Date | A completion date that factors in the risk of delays |
| Project Date Field | Any date you track as a custom field on the project (e.g., "Construction Handover Date") |
| Milestone Due Date | The due date of a related Major Milestone |
Lead Time
How many days before the reference date the task must be finished. This sets the due date.
Lead time = 30 → the task is due 30 days before the opening date.
Duration
How long the task takes, in days. Compass uses this to set the start date:
Start Date = Due Date − Duration
Example: Lead time = 90 days, Duration = 30 days:
- Due date: 90 days before opening
- Start date: 120 days before opening (work starts a month earlier)
Adjust dates when the project timeline shifts
Turn this on if the task's dates should automatically update whenever the reference date on the project changes. This is the right choice for most tasks.
Example: A hotel's opening date shifts from January 1st to March 1st. With this setting on, every affected task moves forward by two months automatically.
Leave it off for tasks with fixed contractual or regulatory deadlines that must not move.
Related Milestone
Link this task to a Major Milestone. The milestone's progress percentage is calculated from the completion of all its related tasks. When 30 out of 100 tasks linked to the "Rooms Ready" milestone are done, the milestone shows 30% complete.
See Major Milestones for more.
Behavior Flags
Three on/off settings that affect how the task influences the project.
Will Delay Project Completion
Turn this on for tasks that are genuine blockers — if this task is overdue, the project cannot be considered complete. Use it sparingly, for real showstoppers:
- Fire & Safety Certificate Obtained
- Health Department License Approved
- PMS and POS Systems Tested and Signed Off
Major Milestone
Marks this item as a Major Milestone rather than a regular task. A milestone is a checkpoint — a significant project goal like "Construction Complete" or "Soft Opening Ready." See Major Milestones.
Delay Will Raise Flag
Turn this on for important tasks where being overdue should get attention, even if it's not a hard blocker. When the task goes overdue, a red flag appears on the project as a high-visibility warning.
Assignment
There are three assignment-related settings on a catalog item. They work very differently from each other — and the differences matter.
No. Assigned to Roles is only a label. It does not create any automatic assignment. If you want tasks to be assigned automatically, you need to use Dynamic (from Project Field) in the Assignees or Owners section. See below for the full explanation.
Assigned to Roles — a label for bulk assignment
What it does: tags the task with a project role name — for example, "Finance Lead", "Spa Director", or "General Manager." That's all. No assignment happens automatically.
What it's for: it enables a manual bulk-assignment workflow. In the Task Dashboard, when you select multiple tasks and click "Assign people to tasks by role", a dialog opens where you map role names to actual users. For example: "Finance Lead = Sarah Chen." Every task tagged with "Finance Lead" is then assigned to Sarah in one action — instead of opening each task individually.
Example: You have 80 tasks tagged with "Finance Lead." You go to the Task Dashboard, select all tasks, click Assign people to tasks by role, enter "Finance Lead = Sarah Chen," and all 80 tasks are assigned to Sarah instantly.
Important: if you never run this bulk-assignment step, the role tag has no effect on who is actually assigned to the task. It's a shortcut for a manual step — not automation.
Assignees — who does the work
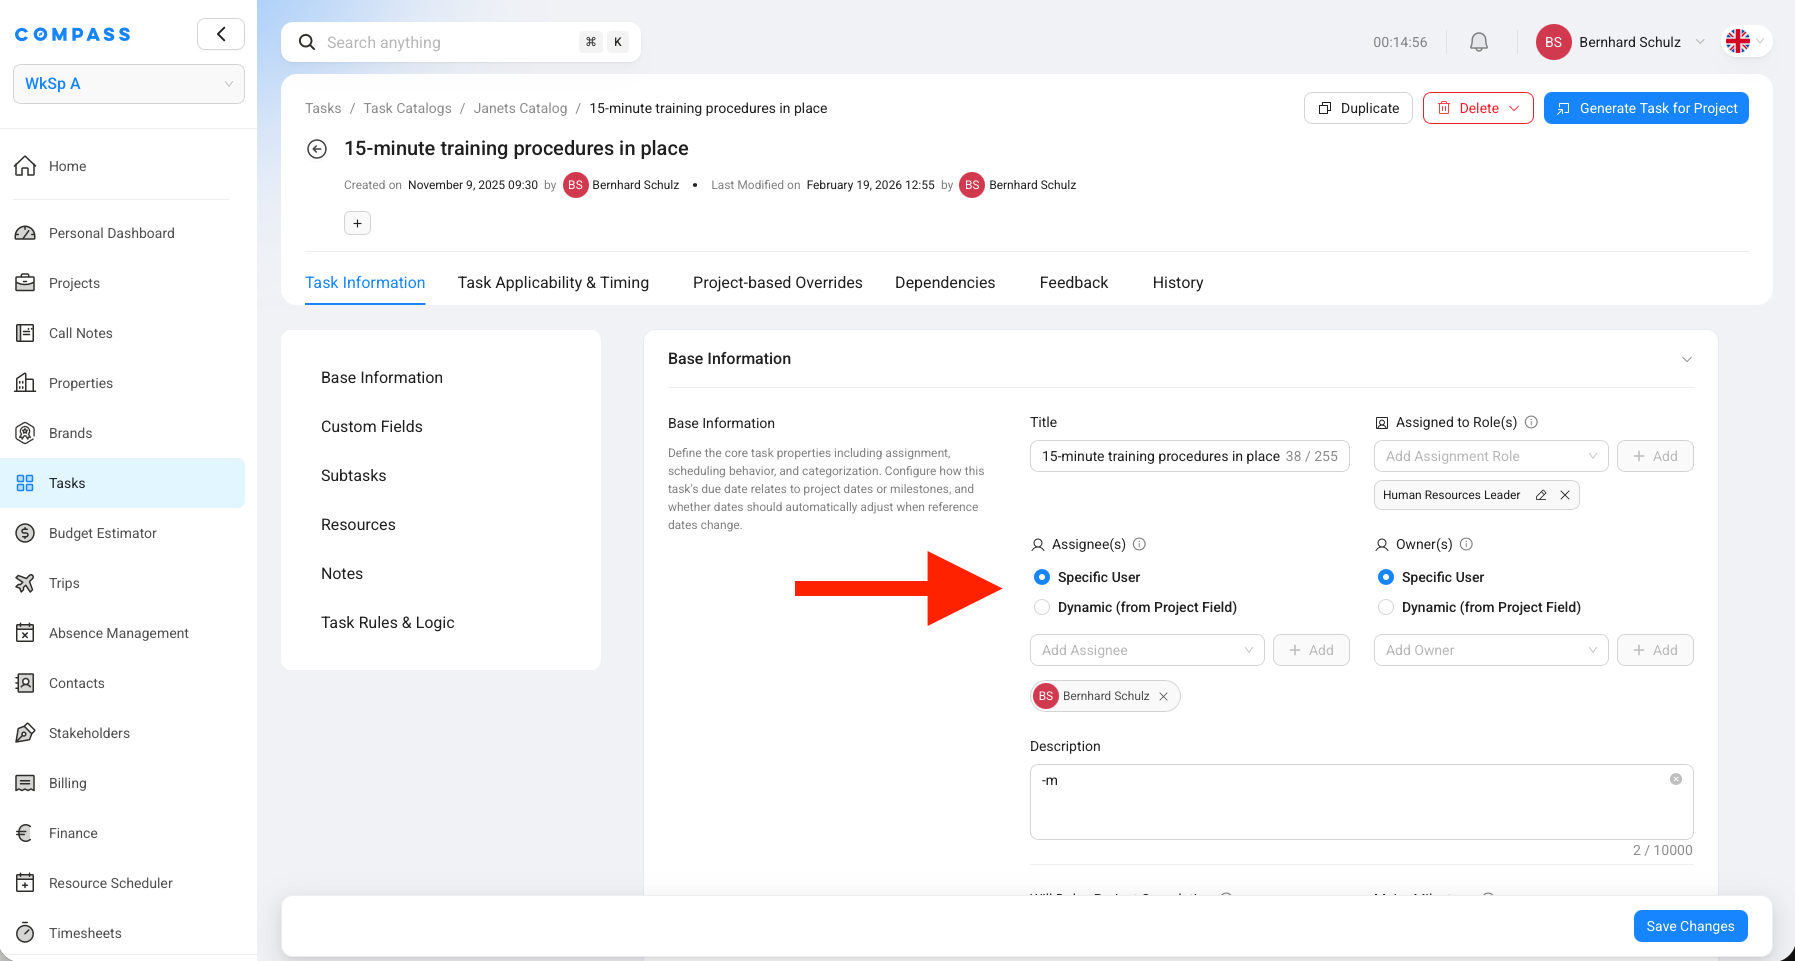
Assignees are the people who will actually perform the task. There are three ways to set them:
Static (specific person) — you name a particular team member directly in the catalog item. That person is always the assignee on every project that generates this task, regardless of which project it is. Use this only for tasks where the same person always does the work across all projects.
Dynamic (from Project Field) — instead of naming a person, you point to a field on the project. When tasks are generated, Compass looks up that field on the project and assigns whoever is listed there. This is the recommended approach for most tasks.
Available project fields for dynamic assignment:
- Primary Director — the project's primary director (built-in field)
- Secondary Director — the project's secondary director (built-in field)
- Any custom user-type field from the Project Blueprint — for example, "Restaurant Manager", "Finance Director", "IT Lead", or any other user reference field you've added to the blueprint
Example: Your blueprint has a custom field "Restaurant Manager." You set the dynamic assignee for all F&B tasks to point to that field. When you fill in "Restaurant Manager = John Doe" on the project, John is automatically assigned to all those tasks. If John is later replaced, all his tasks re-assign to the new person automatically — with no manual work.
Fill in the project's team fields once, and Compass assigns hundreds of tasks to the right people automatically. You don't need to touch individual tasks.
If you set "Restaurant Manager" as the dynamic assignee but haven't filled in who the Restaurant Manager is on the project, the tasks will have no assignee. Always fill in the relevant project fields before or when generating tasks.
Owners — who monitors the task
Owners are responsible for making sure the task gets done — they oversee it but may not do the work themselves. They receive notifications when the task is overdue, when its status changes, and when a completion request is submitted.
Owners have the same three options as Assignees: Static (specific person), Dynamic (from Project Field), or left empty in the catalog to be assigned later.
Summary: which option gives you what
| Setting | Automatic assignment? | When tasks are assigned |
|---|---|---|
| Assigned to Roles | ❌ No | Only after you manually run "Assign people to tasks by role" in the dashboard |
| Static Assignee/Owner | ✅ Yes | Always — the named person is assigned the moment the task is generated |
| Dynamic Assignee/Owner | ✅ Yes | Automatically when tasks are generated, as long as the project field is filled in |
Completion Approval
Turn on Task Completion Requires Approval if the task can't be self-certified. When enabled, the assignee submits a completion request instead of directly marking the task done. Designated approvers must review and approve it.
Example: A fire safety inspection must be verified by the project manager before it counts as complete.
Approvers can be a specific person, someone pulled from a project field, or a project role label (though role-based approvers must be assigned to a real person before they can receive the request — see Task Approvals).
Approval Mode:
- Any — one approver's sign-off is enough
- All — every listed approver must approve before the task is complete
For more on how the approval workflow works end-to-end, see Task Approvals.
Subtasks
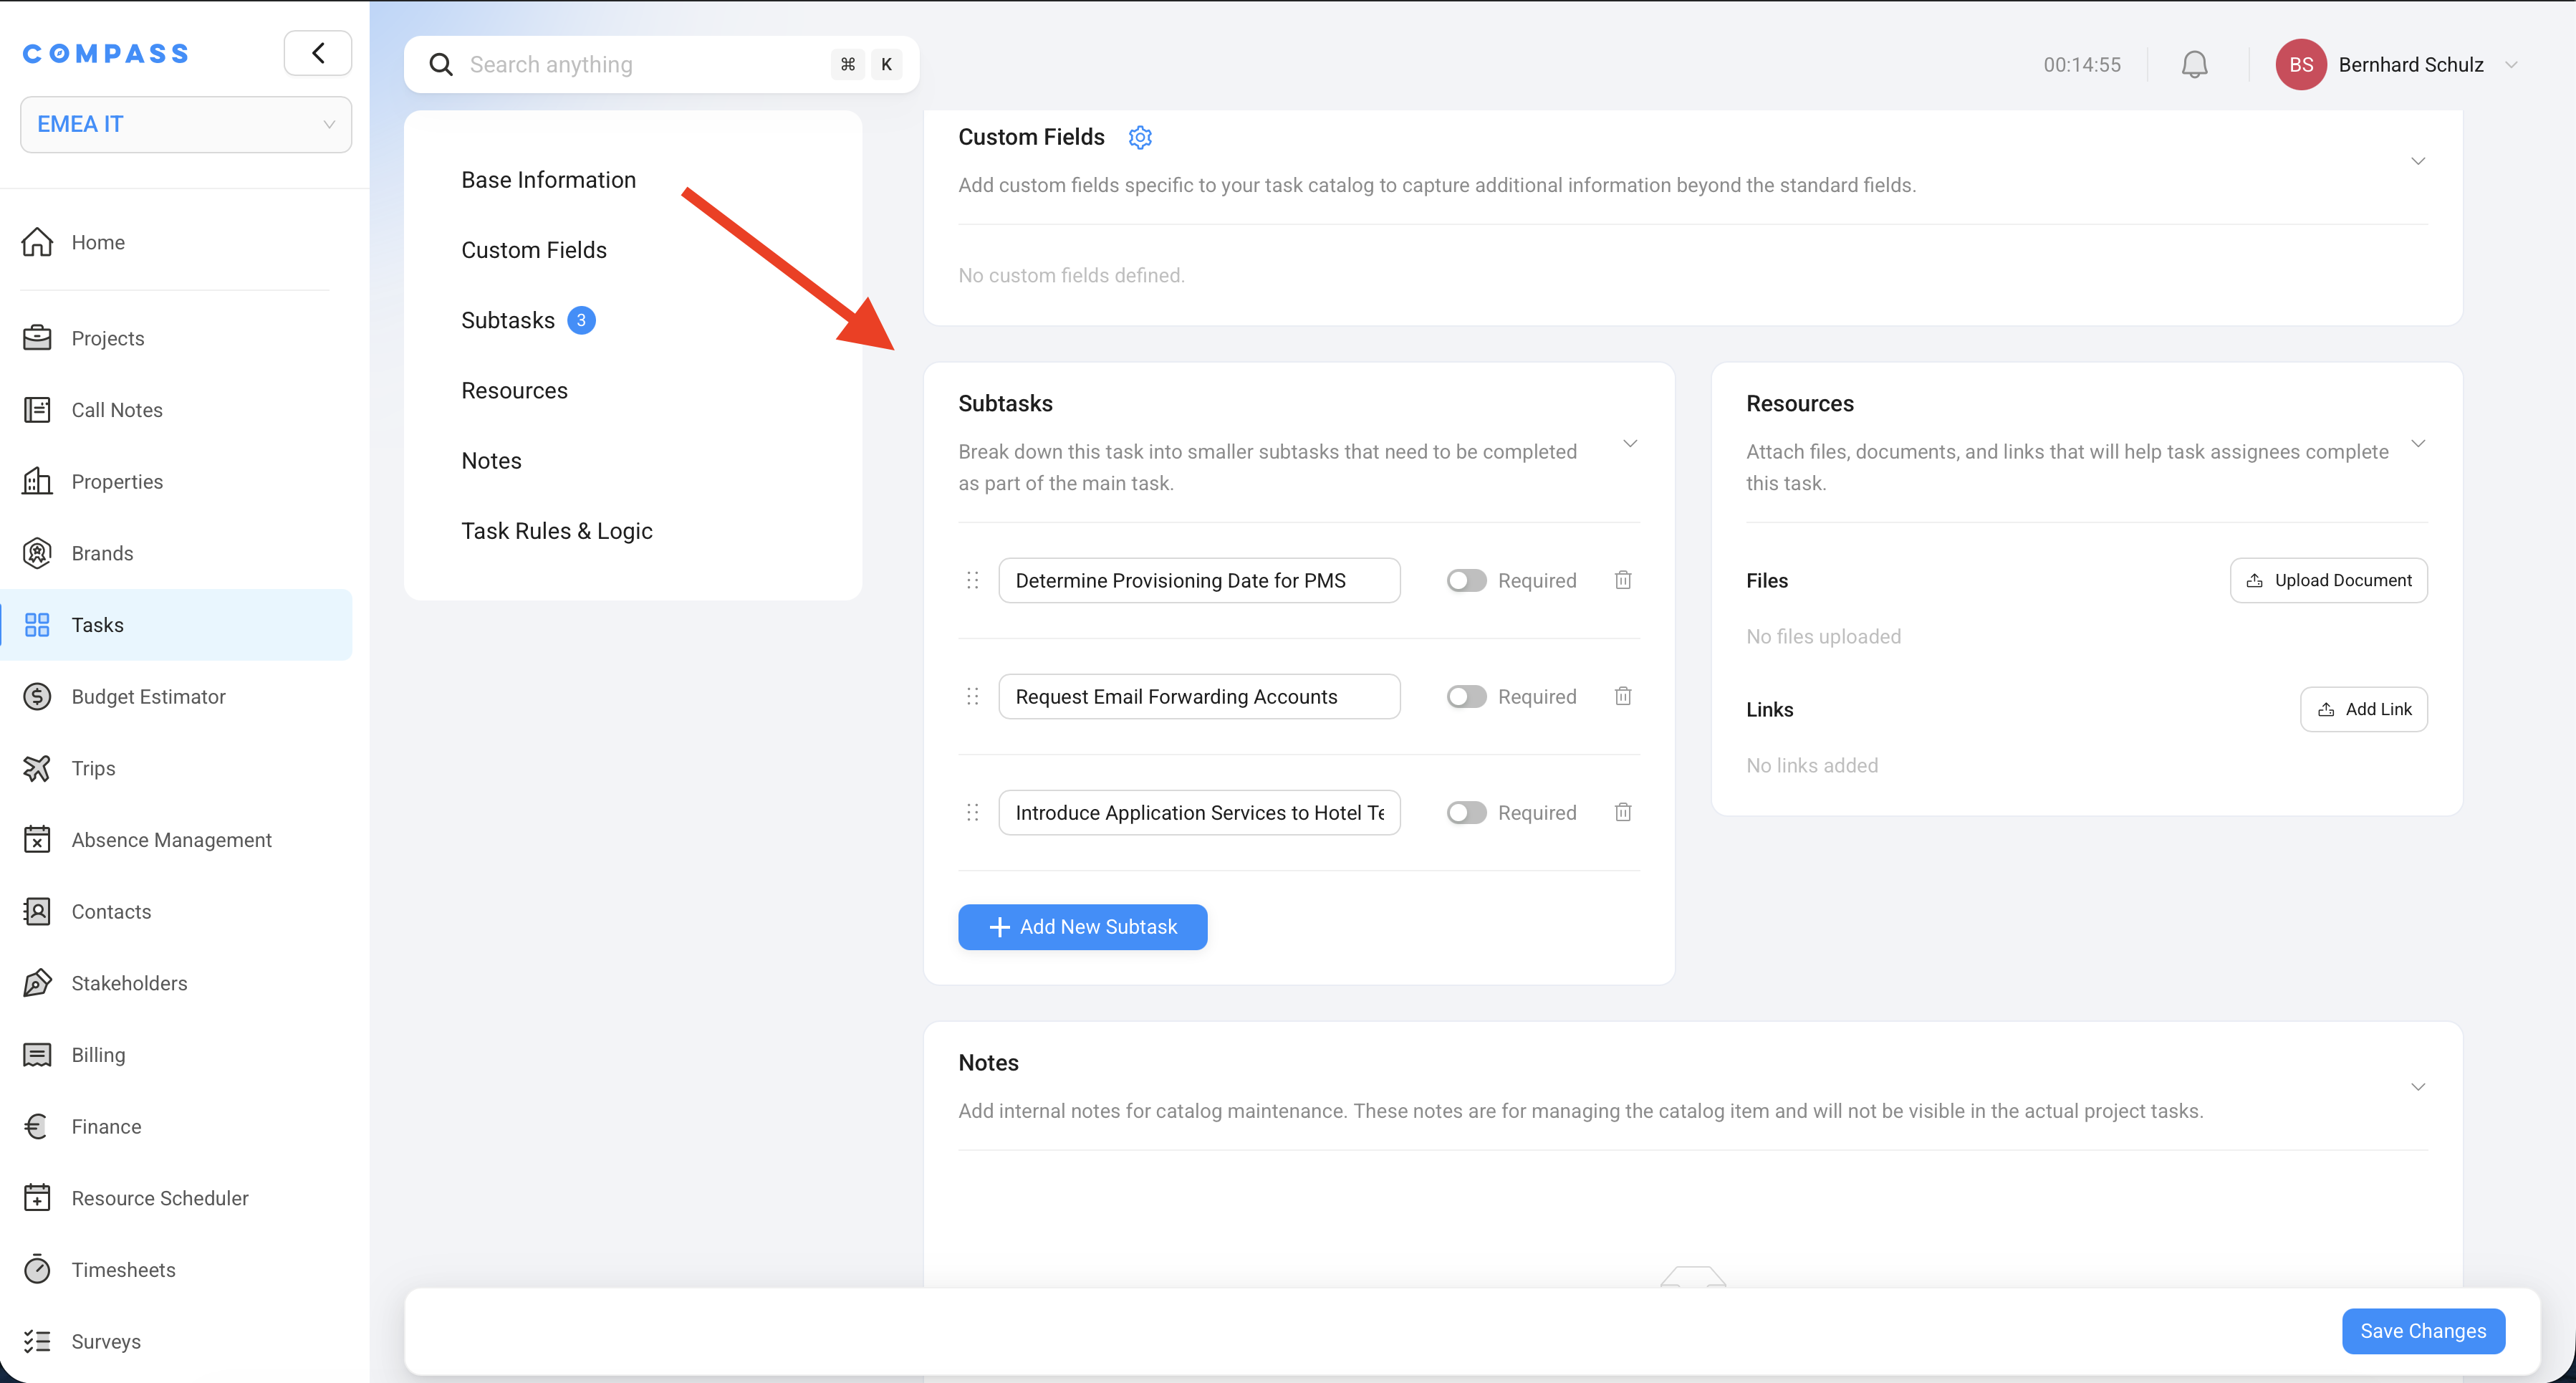
Subtasks are a checklist inside the task — a set of smaller steps that help the assignee work through the task systematically. They are not full tasks: they have no assignee, no due date, no status of their own. They're just checkboxes.
Any subtask can be marked as required. The assignee cannot mark the parent task as complete until all required subtasks are checked off.
Example — Task: Complete Guest Room Inspection
- ☑ Check all lights and electrical outlets (required)
- ☑ Verify HVAC operation (required)
- ☑ Inspect bathroom fixtures (required)
- ☐ Photograph any defects
- ☐ Submit inspection form to Engineering
The three required steps must be checked first. The last two are helpful reminders but don't block completion.
Resources
Resources are files and links that appear on the task to help the assignee do the work. Think of them as supporting materials attached to the task.
Files — documents, templates, checklists, brand standards PDFs, forms.
Links — URLs to external systems: vendor portals, regulatory submission sites, brand standards databases.
Example for the task "Submit Brand Standards Compliance Report":
- Link to the brand's online submission portal
- PDF brand standards checklist
- Word template for the compliance summary
Resources can be overridden per project type using a Project-Based Override — for example, different brands get different versions of the compliance form.
Project-Based Overrides
A Project-Based Override is a table that adjusts the task's details based on what kind of project it is. Instead of creating a separate catalog item for each project variation, you configure one item and let the override table handle the differences.
A catalog item can have multiple matrices — for example, one that controls duration and timing, and another that controls the task name and description. Each matrix has its own set of conditions and overrides.
Setting up a matrix
Click Add Matrix on a catalog item, or Edit Matrix on an existing one. The dialog has three things to configure:
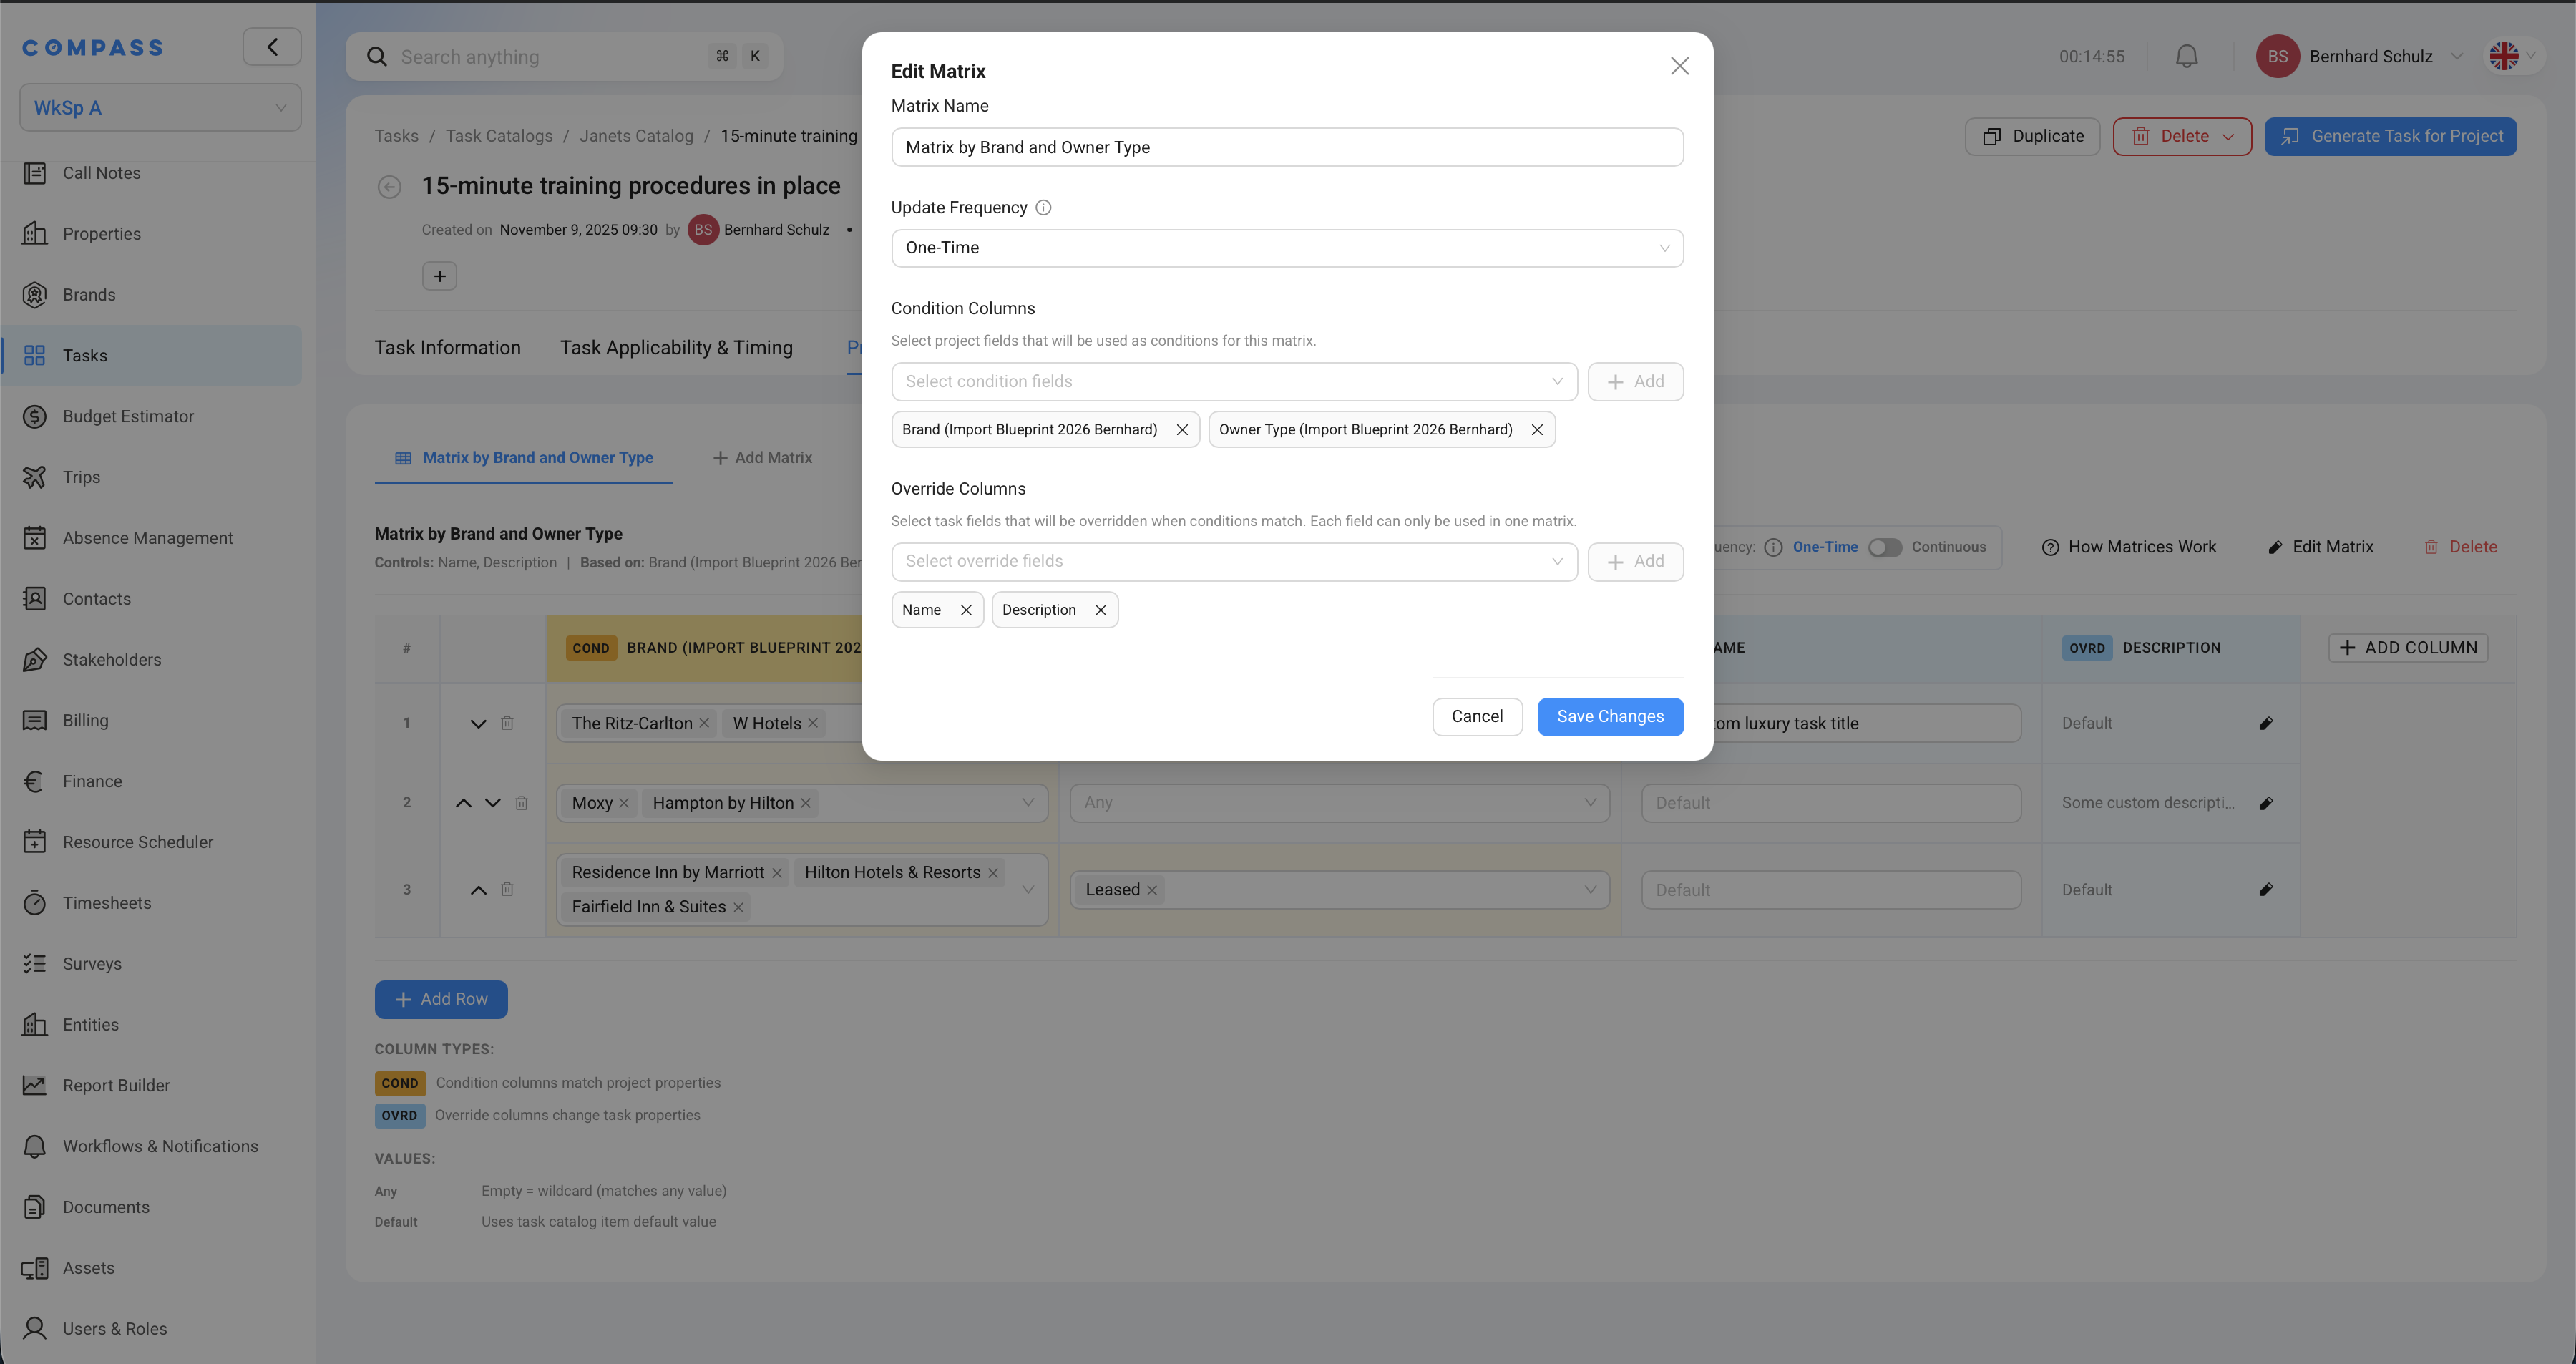
Matrix Name — give it a descriptive name so you can tell matrices apart at a glance. Example: Matrix by Brand and Owner Type.
Update Frequency — how often the overrides are applied:
| Option | What it means |
|---|---|
| One-Time | The override is applied once when the task is first created. After that, changes to project fields have no effect on this task. Use this for properties that are set at project creation and don't change — like brand or property category. |
| Continuous | The override is re-evaluated whenever the relevant project fields are updated. If the conditions still match, non-completed tasks are automatically updated. Use this for project properties that can change during the project's life — like risk level, current phase, or owner type. |
Condition Columns — the project fields you're checking (the "if" side). Select any field from the Project Blueprint: built-in fields like Brand or Region, or any custom field you've added to the blueprint. In the example above, the conditions are Brand and Owner Type — both custom fields from the blueprint.
Override Columns — the task properties you want to change when the conditions match (the "then" side). Examples: Name, Description, Duration, Lead Time, Subtasks, Files, Links. Each task property can only be used as an override column in one matrix — you can't have two matrices both trying to change the same field.
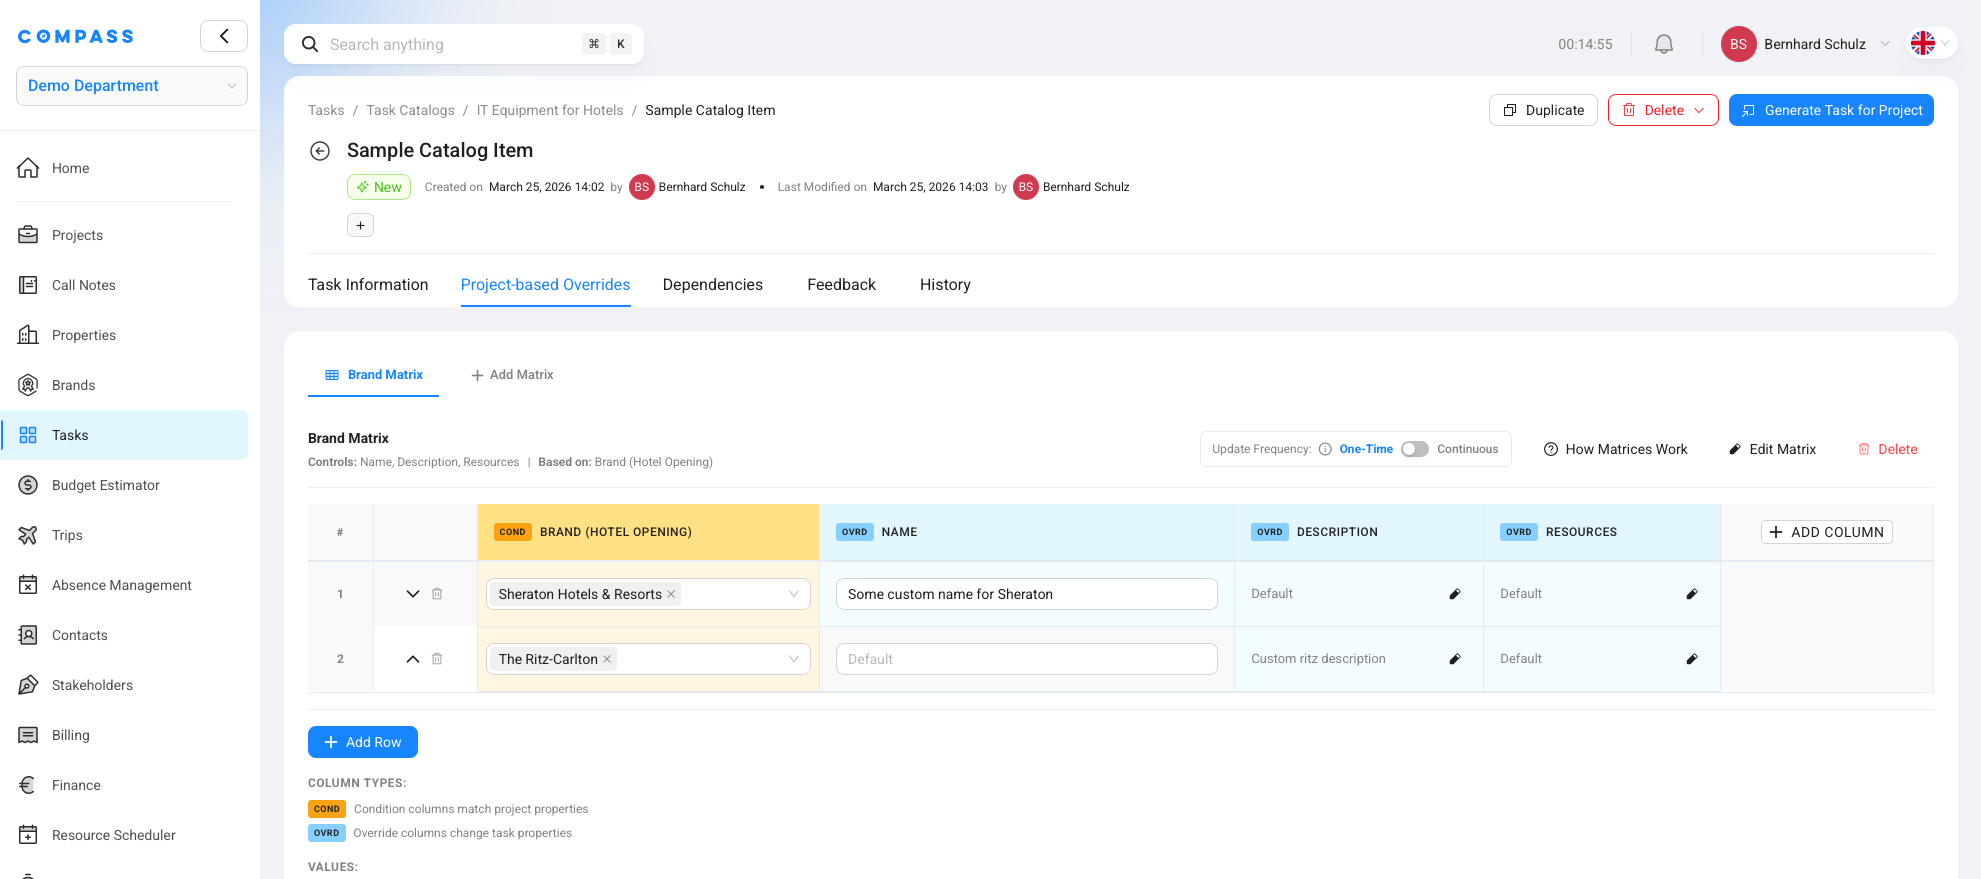
Filling in the rows
Once the matrix is saved, you fill in the rows. Each row is one scenario:
- Condition cells — enter the values that must match. You can enter multiple values in one cell (e.g., The Ritz-Carlton and W Hotels) — these are treated as OR within that cell.
- Override cells — enter the value the task should use when that row matches.
Two special cell values:
- Any — leave the condition cell empty to mean "any value matches." A row with some conditions filled and others left as Any is less specific than a row where all conditions are filled.
- Default — in an override cell, this means "use the task catalog item's default value" rather than a custom override.
When multiple rows could match, Compass picks the most specific one — the row with the most filled-in (non-Any) conditions takes priority.
Example — Matrix by Brand and Owner Type:
| Brand (condition) | Owner Type (condition) | → Name (override) | → Description (override) |
|---|---|---|---|
| The Ritz-Carlton, W Hotels | Any | "Luxury task title" | Default |
| Moxy, Hampton by Hilton | Any | Default | "Some custom description" |
| Residence Inn, Hilton Hotels, Fairfield Inn | Leased | Default | Default |
Row 1 matches any Ritz-Carlton or W Hotels project, regardless of owner type, and changes the task name. Row 3 matches specific brands but only when the owner type is "Leased."
Dependencies
Turn on task dependencies if this task should only start (or finish) once another task is in a certain state. Once enabled, you configure the specific relationship: which task this one is waiting for, and the type of link between them.
See Task Dependencies for a full explanation of how dependency types work and how they appear on project tasks.